
Kia Carens: Power Windows / Power Window Motor Repair procedures
Kia Carens RP (2013-2018) Service Manual / Body Electrical System / Power Windows / Power Window Motor Repair procedures
| Inspection |
Front Power Window Motor
| 1. |
Disconnect the negative (-) battery terminal.
|
| 2. |
Remove the front door trim.
(Refer to Body - "Front Door Trim")
|
| 3. |
Disconnect the connector (A) from the motor.
(A : Safety, B : Standard)
|
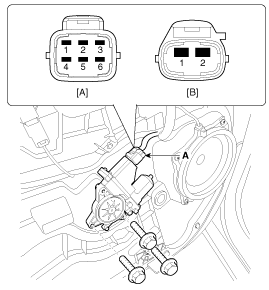
| 4. |
Connect the motor terminals directly to battery voltage (12V) and check
that the motor operates smoothly. Next, reverse the polarity and check
that the motor operates smoothly in the reverse direction. If the operation
is abnormal, replace the motor.
|
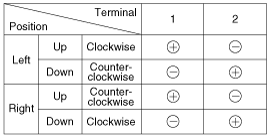
| 5. |
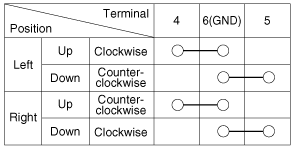
Connect the terminal No. 2 and No. 3 to battery voltage (12V) and check
that the motor operates smoothly when connecting the terminals below.
|
Rear Power Window Motor
| 1. |
Disconnect the negative (-) battery terminal.
|
| 2. |
Remove the rear door trim.
(Refer to Body - "Rear Door Trim")
|
| 3. |
Disconnect the connector (A) from the motor.
(A: Safety, B: Standard)
|
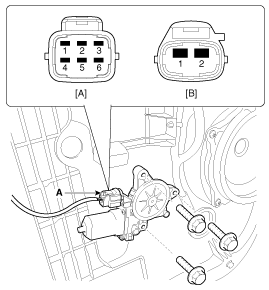
| 4. |
Connect the motor terminals directly to battery voltage (12V) and check
that the motor operates smoothly. Next, reverse the polarity and check
that the motor operates smoothly in the reverse direction. If the operation
is abnormal, replace the motor.
|
| 5. |
Connect the terminal No. 2 and No. 3 to battery voltage (12V) and check
that the motor operates smoothly when connecting the terminals below.
|
 Power Window Motor Schematic diagrams
Circuit Diagram
...
 Power Window Switch Components and components location
Components
Driver Power Window Switch
Assist Power Window Switch
Rear Power Window Switch
...
Other information:
Kia Carens RP (2013-2018) Service Manual: Specifications
Specifications Audio Head Unit Item Specification Model RADIO/CD/MP3 (PA30A) RADIO/CD/MP3 (PA30B) RADIO/CD/MP3/RDS (PA30A R) RADIO/CD/MP3/RDS (PA30B R) Power supply ...
Kia Carens RP (2013-2018) Service Manual: Filler-Neck Assembly Repair procedures
Removal 1. Remove the fuel filler neck assembly after unscrewing the mounting bolts (A). 2. Lift the vehicle. 3. Remove the left - rear wheel & tire and the wheel house. ...
Copyright © www.kicaman.com 2015-2026
