Kia Carens: Airbag Module / Driver Airbag (DAB) Module and Clock Spring Repair procedures
Kia Carens RP (2013-2018) Service Manual / Restraint / Airbag Module / Driver Airbag (DAB) Module and Clock Spring Repair procedures
| Removal |
| 1. |
Set the front tires straight-ahead before removing the steering wheel.
|

| 2. |
Disconnect the battery negative cable.
|

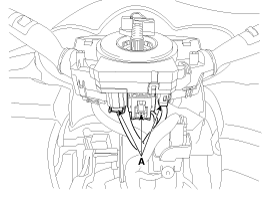
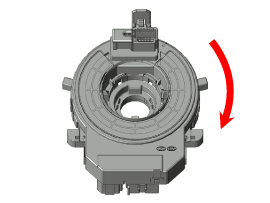
| 3. |
Release the connector locking pin, then disconnect the driver airbag
module connector (B).
|
| 4. |
Remove the steering wheel
(Refer to Steering System - "Steering wheel")
|
| 5. |
Remove the steering column shroud.
|
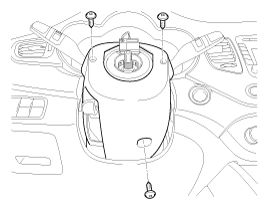
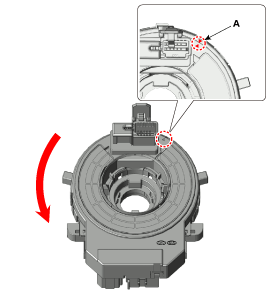
| 6. |
Disconnect the clock spring and horn connector (A), then remove the
clock spring.
|
| Inspection |
| Driver Airbag (DAB) |
If any improper parts are found during the following inspection, replace the
airbag module with a new one.
Never attempt to measure the circuit resistance of the airbag module
(squib) even if you are using the specified tester. If the circuit resistance
is measured with a tester, accidental airbag deployment will result
in serious personal injury.
|
| 1. |
Check pad cover for dents, cracks or deformities.
|
| 2. |
Check the airbag module for denting, cracking or deformation.
|
| 3. |
Check hooks and connectors for damage, terminals for deformities, and
harness for binds.
|
| 4. |
Check airbag inflator case for dents, cracks or deformities.
|
Clock Spring
| 1. |
If, as a result of the following checks, even one abnormal point is
discovered, replace the clock spring with a new one.
|
| 2. |
Check connectors and protective tube for damage, and terminals for deformities.
|
| Installation |
| 1. |
Set the front tires straight-ahead before assembling the steering wheel.
|
| 2. |
Disconnect the battery negative cable.
|
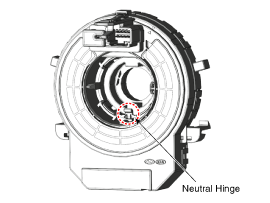
| 3. |
Set the clock spring in center before assembling it to a steering wheel.
|
| 4. |
Connect the clock spring harness connector and horn harness connector
to the clock spring.
|
| 5. |
Install the steering wheel column cover and the steering wheel. (Refer
to the Steering System group- Steering Column and Shaft)
|
| 6. |
Connect the Driver Airbag (DAB) module connector, and then install the
Driver Airbag (DAB) module on the steering wheel.
|
| 7. |
Connect the battery negative cable.
|
| 8. |
Check if the steering wheel remote control, airbag system and horn are
normally operating after turning the handle all the way left and right
when installing air bag module is done.
|
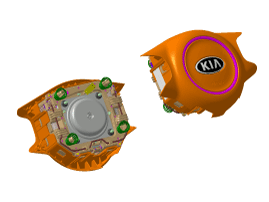
 Driver Airbag (DAB) Module and Clock Spring Components and components location
Components
1. Driver Airbag (DAB)
2. Steering Wheel
3. Clock Spring
...
 Passenger Airbag (PAB) Module Description and operation
Description
The passenger airbag (PAB) is installed inside the crash pad and protects the
front passenger in the event of a frontal crash. The SRSCM determines if and
when to dep ...
Other information:
Kia Carens RP (2013-2018) Service Manual: Components and components location
Components 1. Rear door pull cap 2. Rear door inside handle cap 3. Rear door inside handle cover 4. Rear door delta inner cover 5. Rear door trim 6. Rear door delta garnish 7. Rear door belt inside weatherstrip 8. Rear door belt outside w ...
Kia Carens RP (2013-2018) Service Manual: Components and components location
Components Location 1. Automatic transaxle 2. Inhibitor switch 3. Engine Control Module(ECM) 4. Valve body cover 5. Solenoid valve connect 6. Oil temperature sensor 7. Valve body assembly 8. Line Pressure Control Solenoid Valve 9. SS-A ...
Copyright © www.kicaman.com 2015-2026
