Kia Carens: Air conditioning System / Receiver-Drier Repair procedures
Kia Carens RP (2013-2018) Service Manual / Heating,Ventilation And Air Conditioning / Air conditioning System / Receiver-Drier Repair procedures
| Replacement |
| 1. |
Remove the condenser.
|
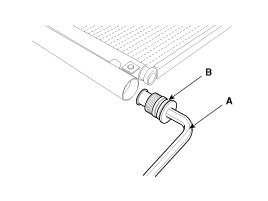
| 2. |
Remove the cap (B) on the bottom of the condenser with a L wrench (A).
|
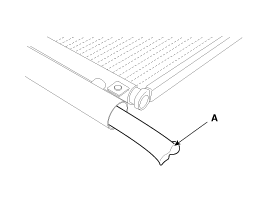
| 3. |
Remove the receiver-drier (A) from condenser using a long nose plier.
Check for crumbled receiver-drier and clogged bottom cap filter.
|
| 4. |
Apply air conditioning compressor oil along the O-rings and threads
of the new bottom cap.
|
| 5. |
Insert a new receiver-drier into the receiver drier tank. The receiver-drier
must be sealed in vacuum before it is exposed to air for use.
|
| 6. |
Install a new bottom cap to the condenser.
|

 Condenser Repair procedures
Inspection
1.
Check the condenser fins for clogging and damage. If clogged, clean
them with water, and blow them with compressed air. If bent, gently
bend th ...
 A/C Pressure Transducer Description and operation
Description
The A/C Pressure Transducer (APT) converts the pressure value of high pressure
line into voltage value after measuring it. By converted voltage value, engine
ECU cont ...
Other information:
Kia Carens RP (2013-2018) Service Manual: Thermostat Repair procedures
Removal Disassembly of the thermostat would have an adverse effect, causing a lowering of cooling efficiency. 1. Drain engine coolant so that its level would be under the therm ...
Kia Carens RP (2013-2018) Owners Manual: Lap/shoulder belt
Height adjustment You can adjust the height of the shoulder belt anchor to one of 4 positions for maximum comfort and safety. The height of the adjusting seat belt should not be too close to your neck. You will not be getting the most effective protection. The shoulder portion should be adjusted ...
Copyright © www.kicaman.com 2015-2026
