
Kia Carens: Cooling System / Thermostat Repair procedures
Kia Carens RP (2013-2018) Service Manual / Engine Mechanical System / Cooling System / Thermostat Repair procedures
| Removal |
Disassembly of the thermostat would have an adverse effect, causing
a lowering of cooling efficiency.
|

| 1. |
Drain engine coolant so that its level would be under the thermostat
height.
|
| 2. |
Remove the radiator lower hose.
(Refer to Cooling System - "Radiator Hose")
|
| 3. |
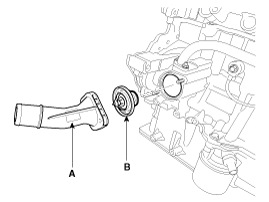
Remove the water inlet fitting (A) and thermostat (B).
|
| Inspection |
| 1. |
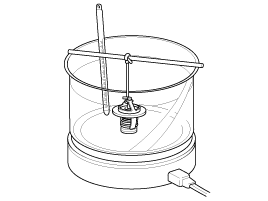
Immerse thermostat in water heated to over 95°C (203°F), then heat
for at least 3 minutes to check valve lift.
|
| 2. |
Check the valve opening temperature.
If the valve opening temperature is not as specified, replace the thermostat.
|
| 3. |
Check the valve lift.
If the valve lift is not as specified, replace the thermostat.
|
| Installation |
| 1. |
Place the thermostat in the block.
Install the thermostat (B) with the jiggle valve upward.
|
| 2. |
Install the water inlet fitting (A).
|
| 3. |
Fill with engine coolant.
|
| 4. |
Start engine and check for leaks.
|
 Thermostat Components and components location
Components
1. Water inlet fitting
2. Thermostat
...
 Thermostat Troubleshooting
Troubleshooting
Symptoms
Possible Causes
Remedy
Coolant leakage
•
From the thermostat ...
Other information:
Kia Carens RP (2013-2018) Service Manual: Assist Handle Repair procedures
Replacement • Put on gloves to protect your hands. • When ...
Kia Carens RP (2013-2018) Service Manual: Rear Pillar Trim Components and components location
Component Location 1. Rear pillar trim ...
Copyright © www.kicaman.com 2015-2026
