Kia Carens: Rear Seat / Rear Seat Back Cover Repair procedures
[Second row seat assembly]
| (Except Europe and Australia) |
| • |
Put on gloves to protect your hands.
|
|
| • |
When prying with a flat-tip screwdriver, wrap it with protective
tape, and apply protective tape around the related parts, to
prevent damage.
|
| • |
Use a plastic panel removal tool to remove interior trim pieces
to protect from marring the surface.
|
| • |
Take care not to bend or scratch the trim and panels.
|
|
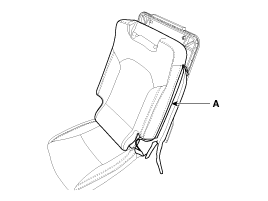
| 1. |
Remove the second row seat assembly.
(Refer to Rear Seat - "Rear Seat Assembly")
|
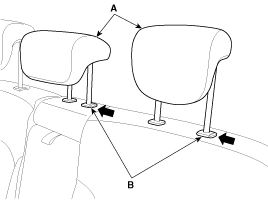
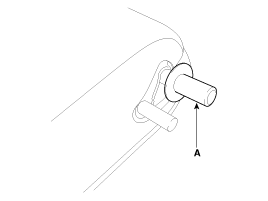
| 2. |
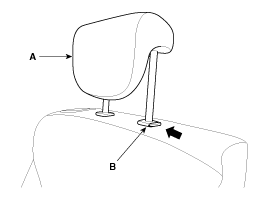
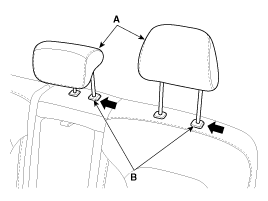
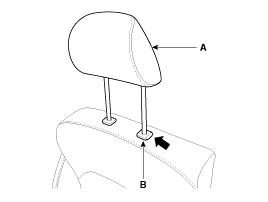
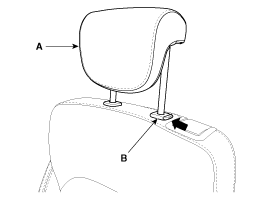
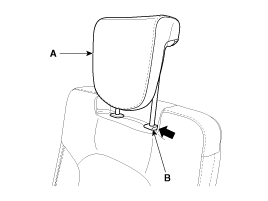
Push the lock pin (B), remove the rear seat headrest (A).
|
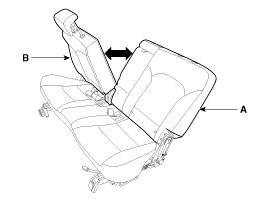
| 3. |
Recline the seat back [LH](A) rearward and seat back [RH](B) forward.
|
| 4. |
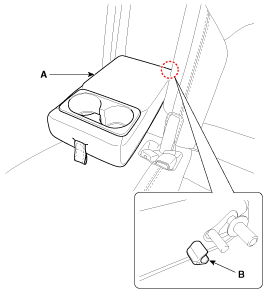
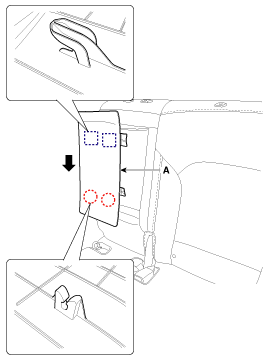
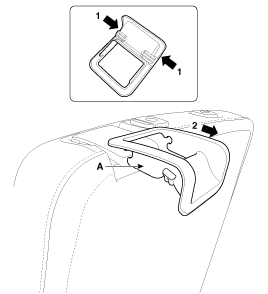
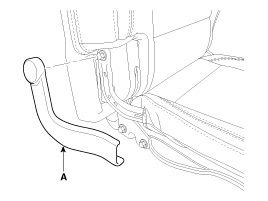
Remove the rear seat armrest board hinge cover (A).

|
| 5. |
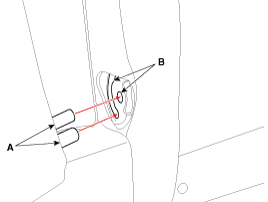
Loosen the rear seat armrest mounting bolt (A).
|
| 6. |
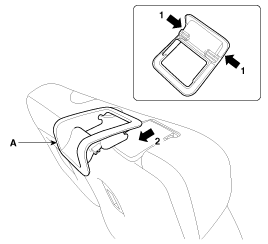
Press the rear seat armrest (B) in the direction of the arrow in the
below picture, and then remove it by pulling it up.
| •
|
Rear seat armrest installment
|
|
| (1) |
Install the cap (A) on the side part of the armrest.
|
| (2) |
Put the right side part (A) of the armrest into the hole (B).
|
| (3) |
Push the armrest (A) sidewards in the direction of the arrow,
and then install it.

|
|
| 7. |
Using a screwdriver or remover, remove the rear seat armrest board (A).
|
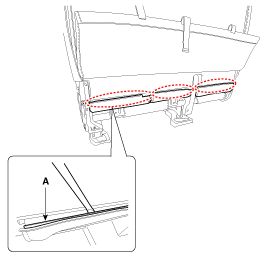
| 8. |
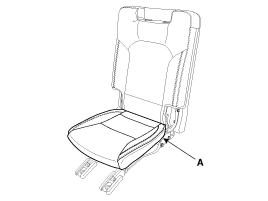
Remove the rear seat lower protector (A).
|
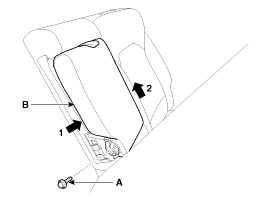
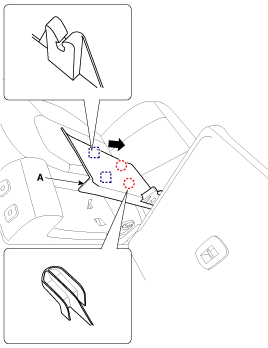
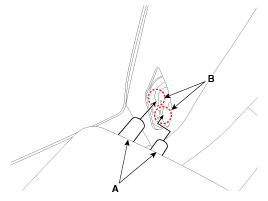
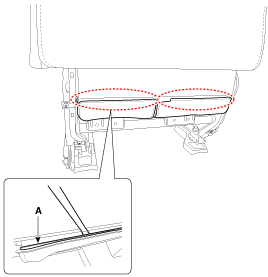
| 9. |
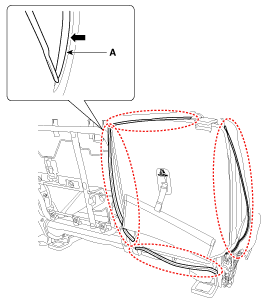
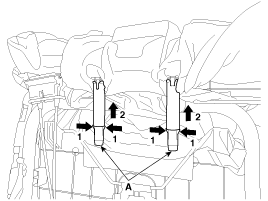
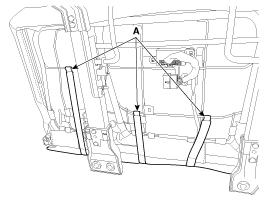
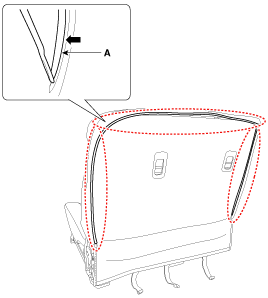
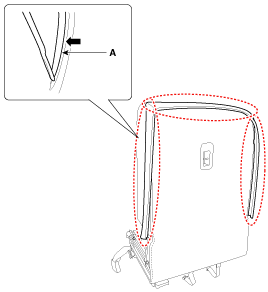
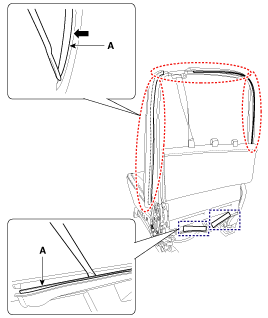
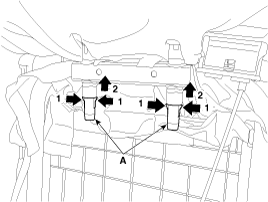
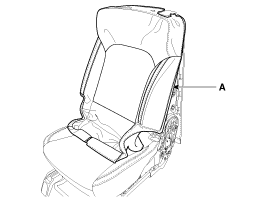
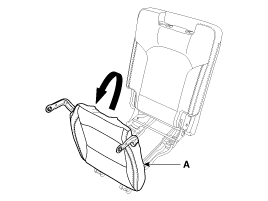
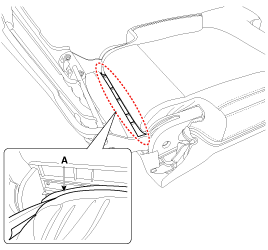
Pull out the hooks (A) by the rear seat back frame.
|
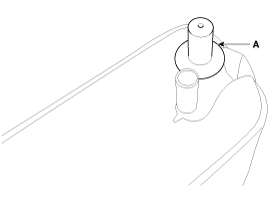
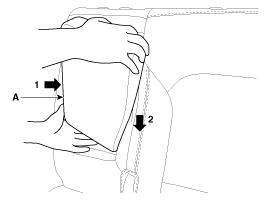
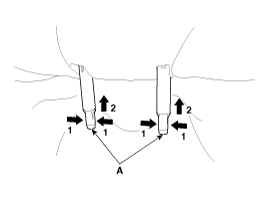
| 10. |
Turn the rear seat back cover inside out. Then pull out the headrest
guides (A) while pinching both sides of the lower part of the guides,
and remove them.
|
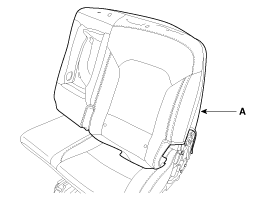
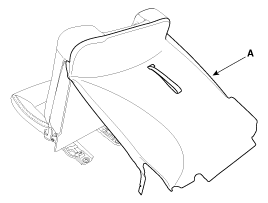
| 11. |
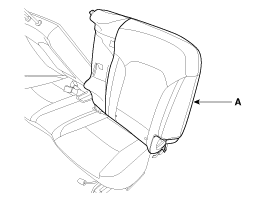
Remove the rear seat back cover (A) from the rear seat back frame.
|
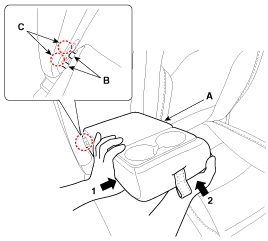
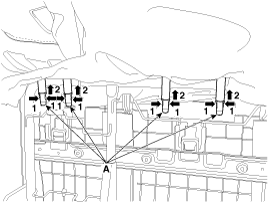
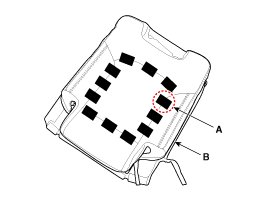
| 12. |
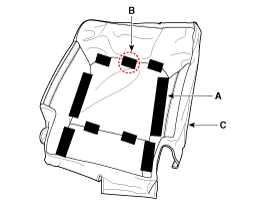
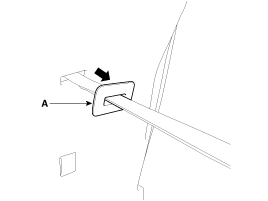
After removing the velcro tape (A) and hog-ring clips (B) on the rear
of seat back and remove the rear seat back cover (C).
|
| 13. |
Install in the reverse order of removal.
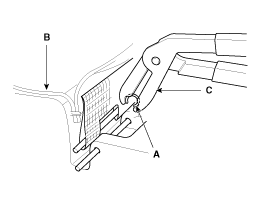
| •
|
To prevent wrinkles, make sure the material is stretched
evenly over the cover (B) before securing the hog-ring
clips (A).
|
| •
|
Replace the hog-ring clips with new ones using special
tool (C) (09880-4F000).
|
|
|
| • |
Put on gloves to protect your hands.
|
|
| • |
When prying with a flat-tip screwdriver, wrap it with protective
tape, and apply protective tape around the related parts, to
prevent damage.
|
| • |
Use a plastic panel removal tool to remove interior trim pieces
to protect from marring the surface.
|
| • |
Take care not to bend or scratch the trim and panels.
|
|
| 1. |
Remove the second row seat assembly.
(Refer to Rear Seat - "Rear Seat Assembly")
|
| 2. |
Push the lock pin (B), remove the rear seat headrest (A).
|
| 3. |
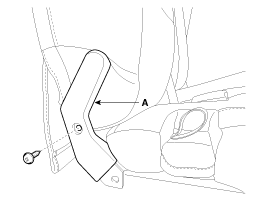
Using a screwdriver or remover, remove the rear seat back webbing lever
upper bezel (A).
|
| 4. |
Remove the rear seat lower protector (A).
|
| 5. |
Pull out the hooks (A) by the rear seat back frame.
|
| 6. |
Turn the rear seat back cover inside out. Then pull out the headrest
guides (A) while pinching both sides of the lower part of the guides,
and remove them.
|
| 7. |
Remove the rear seat back cover (A) from the rear seat back frame.

|
| 8. |
After removing the velcro tape (A) and hog-ring clips (B) on the rear
of seat back and remove the rear seat back cover (C).
|
| 9. |
Install in the reverse order of removal.
| •
|
To prevent wrinkles, make sure the material is stretched
evenly over the cover (B) before securing the hog-ring
clips (A).
|
| •
|
Replace the hog-ring clips with new ones using special
tool (C) (09880-4F000).
|
|
|
| (Except Europe and Australia) |
| • |
Put on gloves to protect your hands.
|
|
| • |
When prying with a flat-tip screwdriver, wrap it with protective
tape, and apply protective tape around the related parts, to
prevent damage.
|
| • |
Use a plastic panel removal tool to remove interior trim pieces
to protect from marring the surface.
|
| • |
Take care not to bend or scratch the trim and panels.
|
|
| 1. |
Remove the second row seat assembly [LH].
(Refer to Rear Seat - "Rear Seat Assembly")
|
| 2. |
Push the lock pin (B), remove the rear seat headrest (A).
|
| 3. |
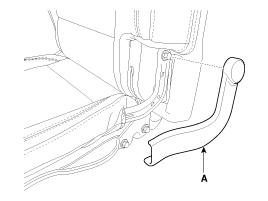
Remove the lock hook (B) and then remove the rear armrest (A).
| •
|
Rear seat armrest installment
|
|
| (1) |
Install the cap (A) on the side part of the armrest.
[LH]
[RH]

|
| (2) |
Put the right side part (A) of the armrest into the hole (B).
|
| (3) |
Push the armrest (A) downwards.
|
| (4) |
Push the armrest sidewards in the direction of the arrow, and
then install it.
|
| (5) |
Install the armrest (A) by putting in the left part (B) of the
armrest into the hole (C).
|
| (6) |
Push in the lock hook (B) right side part of the rear armrest
(A).
|
|
| 4. |
Using a screwdriver or remover, remove the rear seat armrest board (A).
|
| 5. |
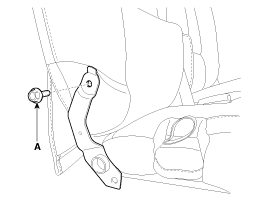
After loosening the mounting screw, then remove the rear seat inner
hinge bracket cover (A).
|
| 6. |
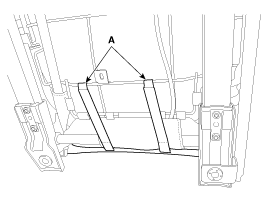
Loosen the rear seat inner hinge bracket mounting bolt (A).
|
| 7. |
Remove the rear seat lower protector (A).
|
| 8. |
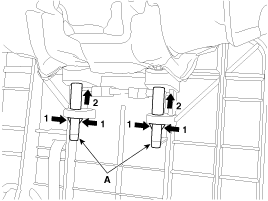
Remove the hooks (A) located in the side and upper part of the rear
seat back.
|
| 9. |
Remove the hooks (A) located in the bottom side of the rear seat back.
|
| 10. |
Turn the rear seat back cover inside out. Then pull out the headrest
guides (A) while pinching both sides of the lower part of the guides,
and remove them.
|
| 11. |
Remove the rear seat back cover (A) from the rear seat back frame.
|
| 12. |
After removing the velcro tape (A) and hog-ring clips (B) on the rear
of seat back and remove the rear seat back cover (C).
|
| 13. |
Install in the reverse order of removal.
| •
|
To prevent wrinkles, make sure the material is stretched
evenly over the cover (B) before securing the hog-ring
clips (A).
|
| •
|
Replace the hog-ring clips with new ones using special
tool (C) (09880-4F000).
|
|
|
| • |
Put on gloves to protect your hands.
|
|
| • |
When prying with a flat-tip screwdriver, wrap it with protective
tape, and apply protective tape around the related parts, to
prevent damage.
|
| • |
Use a plastic panel removal tool to remove interior trim pieces
to protect from marring the surface.
|
| • |
Take care not to bend or scratch the trim and panels.
|
|
| 1. |
Remove the second row seat assembly [RH].
(Refer to Rear Seat - "Rear Seat Assembly")
|
| 2. |
Push the lock pin (B), remove the rear seat headrest (A).
|
| 3. |
Remove the rear seat lower protector (A).
|
| 4. |
Remove the hooks (A) located in the side and upper part of the rear
seat back.
|
| 5. |
Remove the hooks (A) located in the bottom side of the rear seat back.
|
| 6. |
Turn the rear seat back cover inside out. Then pull out the headrest
guides (A) while pinching both sides of the lower part of the guides,
and remove them.
|
| 7. |
Remove the rear seat back cover (A) from the rear seat back frame.

|
| 8. |
After removing the velcro tape (A) and hog-ring clips (B) on the rear
of seat back and remove the rear seat back cover (C).
|
| 9. |
Install in the reverse order of removal.
| •
|
To prevent wrinkles, make sure the material is stretched
evenly over the cover (B) before securing the hog-ring
clips (A).
|
| •
|
Replace the hog-ring clips with new ones using special
tool (C) (09880-4F000).
|
|
|
| (For Europe and Australia) |
| • |
Put on gloves to protect your hands.
|
|
| • |
When prying with a flat-tip screwdriver, wrap it with protective
tape, and apply protective tape around the related parts, to
prevent damage.
|
| • |
Use a plastic panel removal tool to remove interior trim pieces
to protect from marring the surface.
|
| • |
Take care not to bend or scratch the trim and panels.
|
|
| 1. |
Remove the second row seat assembly.
(Refer to Rear Seat - "Rear Seat Assembly")
|
| 2. |
Push the lock pin (B), remove the rear seat headrest (A).
|
| 3. |
Using a screwdriver or remover, remove the rear seat back webbing lever
upper bezel (A).
|
| 4. |
Remove the rear seat lower protector (A).
|
| 5. |
Pull out the hooks (A) by the rear seat back frame.
|
| 6. |
Turn the rear seat back cover inside out. Then pull out the headrest
guides (A) while pinching both sides of the lower part of the guides,
and remove them.
|
| 7. |
Remove the rear seat back cover (A) from the rear seat back frame.
|
| 8. |
After removing the velcro tape (A) and hog-ring clips (B) on the rear
of seat back and remove the rear seat back cover (C).
|
| 9. |
Install in the reverse order of removal.
| •
|
To prevent wrinkles, make sure the material is stretched
evenly over the cover (B) before securing the hog-ring
clips (A).
|
| •
|
Replace the hog-ring clips with new ones using special
tool (C) (09880-4F000).
|
|
|
[Third row seat assembly]
| • |
Put on gloves to protect your hands.
|
|
| • |
When prying with a flat-tip screwdriver, wrap it with protective
tape, and apply protective tape around the related parts, to
prevent damage.
|
| • |
Use a plastic panel removal tool to remove interior trim pieces
to protect from marring the surface.
|
| • |
Take care not to bend or scratch the trim and panels.
|
|
| 1. |
Remove the third row seat assembly.
(Refer to Rear Seat - "Rear Seat Assembly")
|
| 2. |
Push the lock pin (B), remove the rear seat headrest (A).
|
| 3. |
Remove the rear seat side link cover (A).
[LH]
[RH]
|
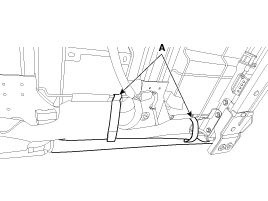
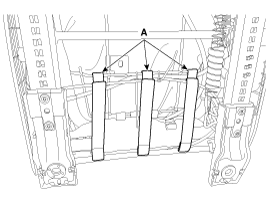
| 4. |
Loosen the rear seat frame mounting bolts (A).
|
Tightening torque :
44.1 ~ 53.9 N.m (4.5 ~ 5.5 kgf.m, 32.5 ~ 39.8 lb-ft)
|
|
| 5. |
Push the rear seat cushion frame (A) to the front of the vehicle as
far as possible.
|
| 6. |
Remove the folding cover (A).
|
| 7. |
Pull out the hooks (A) by the rear seat back frame.
|
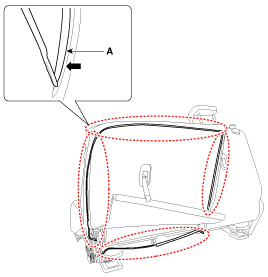
| 8. |
Zip off the rear seat back cover located in the side (A), and then pull
it up.
|
| 9. |
Turn the rear seat back cover inside out. Then pull out the headrest
guides (A) while pinching both sides of the lower part of the guides,
and remove them.
|
| 10. |
Loosen the rear seat back board upper cover mounting screws (A).
|
| 11. |
Remove the rear seat back cover (A) from the rear seat back frame.
|
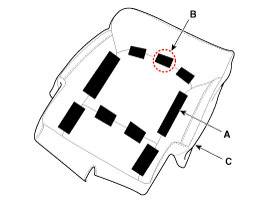
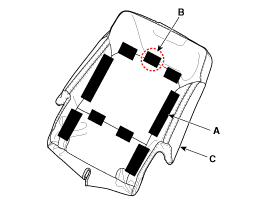
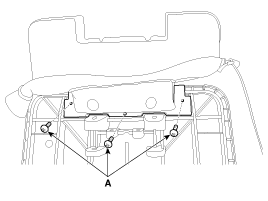
| 12. |
After removing the hog-ring clips (A) on the rear of seat back and remove
the rear seat back cover (B).
|
| 13. |
Install in the reverse order of removal.
| •
|
To prevent wrinkles, make sure the material is stretched
evenly over the cover (B) before securing the hog-ring
clips (A).
|
| •
|
Replace the hog-ring clips with new ones using special
tool (C) (09880-4F000).
|
|
|
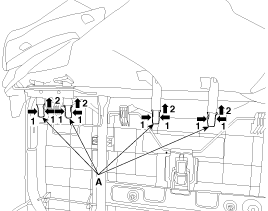
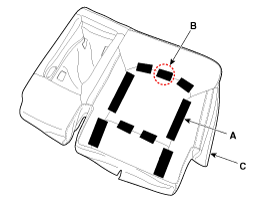
Component Location
[Second row seat assembly]
(Except Europe and Australia)
[5-seat vehicle]
1. Rear seat back cover [LH]
...
Component Location
[Second row seat assembly]
(Except Europe and Australia)
[5-seat vehicle]
1. Rear seat cushion cover
...
Other information:
Replacement
[Hood upper latch assembly]
1.
After loosening the mounting bolt, then remove the hood upper latch
assembly (A).
Tightening torque :
7.8 ~ 11.8N.m (0.8 ~ 1.2kgf.m, 5.8 ~ 8.7 lb-ft)
...
Description
•
35R clutch control solenoid valve is a Variable Force Solenoid (VFS)
type.
•
When TCM supplies variable current to solenoid valve, hydraulic pressure
of 35R clutch is controlled by solenoid valve.
...


 Rear Seat Back Cover Components and components location
 Rear Seat Cushion Cover Components and components location