Kia Carens: Heater / PTC Heater (Diesel only) Repair procedures
Kia Carens RP (2013-2018) Service Manual / Heating,Ventilation And Air Conditioning / Heater / PTC Heater (Diesel only) Repair procedures
| Inspection |
Operating Logic Test (Manual only)
Inspect the PTC operation with the confirmation logic below :
| 1. |
Entering
|
| 2. |
Forced operation
|
| 3. |
Cancellation
|
Operating Logic Test (DATC only)
The operating logic test can be confirmed with GDS.
Operating Test
This test should be performed in the PTC ON conditions.
| 1. |
Run the engine.
|
| 2. |
Check the current on the wiring with a clamp multi tester.
|
| 3. |
If the current is not within specification, inspect the related wiring.
|
Resistance Test
| 1. |
Turn the ignition switch OFF.
|
| 2. |
Disconnect the PTC heater connector.
|
| 3. |
Measure the resistance between terminal 1, 2, 3 of PTC heater and ground
line.
|
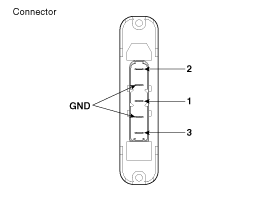
| 4. |
If the measured resistance is not within specification, replace the
PTC heater with a new one.
|
| Replacement |
| 1. |
Disconnect the negative (-) battery terminal.
|
| 2. |
Remove the crash pad lower panel.
(Refer to Body - "Crash Pad Lower Panel")
|
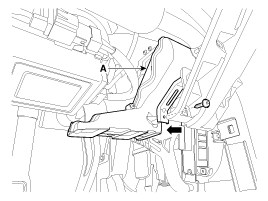
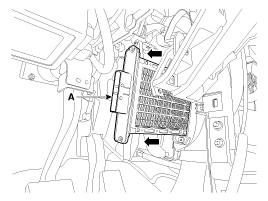
| 3. |
Remove the driver's side shower duct (A) after loosening the screw.
|
| 4. |
Disconnect the PTC heater connector (A).
|

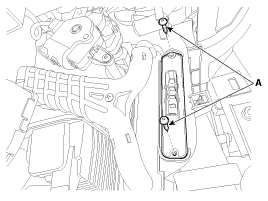
| 5. |
Loosen the PTC heater core mounting screws (A).
|
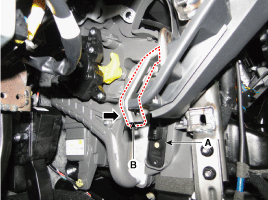
| 6. |
To remove the PTC heater core (A), slightly bend the driver's side shower
duct bracket (B) by pulling it inward.
|
| 7. |
Remove the PTC heater core (A).
|
| 8. |
Install in the reverse order of removal.
|
 PTC Heater (Diesel only) Description and operation
Description
The PTC (Positive Temperature Coefficient) heater is installed at the exit or
the backside of the heater core.
The PTC heater is an electric heater using a PTC elem ...
 Temperature Control Actuator Description and operation
Description
The heater unit includes mode control actuator and temperature control actuator.
The temperature control actuator is located at the heater unit. It regulates
the t ...
Other information:
Kia Carens RP (2013-2018) Service Manual: Front Impact Sensor (FIS) Repair procedures
Removal • Removal of the airbag must be performed according to the precautions/ procedures described previously. • Before disco ...
Kia Carens RP (2013-2018) Service Manual: Front Wheel Speed Sensor Components and components location
Components 1. Front wheel speed sensor 2. Front wheel speed sensor connector ...
Copyright © www.kicaman.com 2015-2026
