Kia Carens: Fuel Delivery System / Fuel Line Repair procedures
Kia Carens RP (2013-2018) Service Manual / Engine Control / Fuel System / Fuel Delivery System / Fuel Line Repair procedures
| Removal |
| 1. |
Release the residual pressure in fuel line.
(Refer to Fuel Delivery System - “Release Residual Pressure in Fuel
Line”)
|
| 2. |
Turn the ignition switch OFF, and then remove battery (-) cable.
|
| 3. |
Remove the fuel tank.
(Refter to Fuel Delivery System - "Fuel Tank")
|
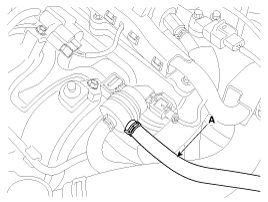
| 4. |
Disconnect the low pressure fuel feed tube quick-connector (A).
|
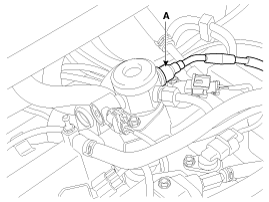
| 5. |
Disconnect the vapor hose (A) which is connected from the PCSV.
|
| 6. |
Lift the vehicle.
|
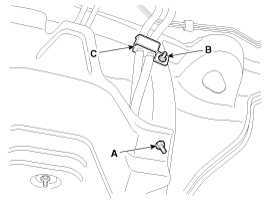
| 7. |
Remove the heat protector installation nut (A).
|
| 8. |
Remove the fuel line fixing bracket (B) after removing the installation
nut (C).
|
| 9. |
Open the fuel line fixing clip with the (-) driver.
|
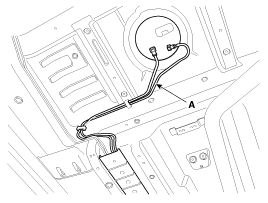
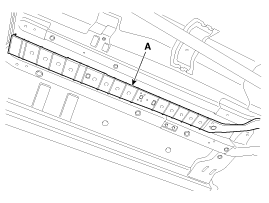
| 10. |
Remove the fuel line (A) under the vehicle. Be careful not to damage
the fuel line.
|
| 11. |
Open the fuel line fixing clip with the (-) driver.
|
| 12. |
Remove the fuel line (A) under the vehicle. Be careful not to damage
the fuel line.
|

| Installation |
|

| 1. |
Install in the reverse order of removal.
|
 Fuel Pressure Regulator Repair procedures
Removal
1.
Remove the fuel pump.
(Refer to Fuel Delivery System - " Fuel Pump")
2.
Disconnect the electric pump wirin ...
 Filler-Neck Assembly Repair procedures
Removal
1.
Remove the fuel filler neck assembly after unscrewing the mounting bolts
(A).
2.
Lift the vehicle.
...
Other information:
Kia Carens RP (2013-2018) Owners Manual: Parking brake - Hand type
Applying the parking brake To engage the parking brake, first apply the foot brake and then without pressing the release button in, pull the parking brake lever up as far as possible. In addition it is recommended that when parking the vehicle on a gradient, the shift lever should be positioned ...
Kia Carens RP (2013-2018) Owners Manual: Headrest
The driver's and front passenger's seats are equipped with a headrest for the occupant's safety and comfort. The headrest not only provides comfort for the driver and front passenger, but also helps protect the head and neck in the event of a collision. WARNING For maximum effectiveness in case ...
Copyright © www.kicaman.com 2015-2026
