Kia Carens: Windshield Wiper/Washer / Front Wiper Motor Repair procedures
Kia Carens RP (2013-2018) Service Manual / Body Electrical System / Windshield Wiper/Washer / Front Wiper Motor Repair procedures
| Removal |
|

If you remove a wiper arm, replace it with a new one.
If you reassemble the removed arm, its serration wear may cause the wiper to
be set off position. If you turn on the wiper while in this condition, some
interference may occur between the blades or between the wiper and the cowl
cover or the A-pillar.
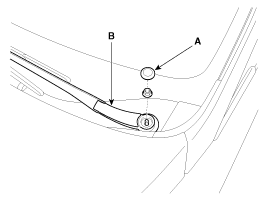
| 1. |
Disconnect the negative (-) battery terminal.
|
| 2. |
Loosen the windshield wiper arm nut after removing a wiper cap (A).
|
| 3. |
Remove the windshield wiper arm and blade (B).
|
| 4. |
Remove the cowl top cover.
(Refer to - "Cowl Top Cover")
|
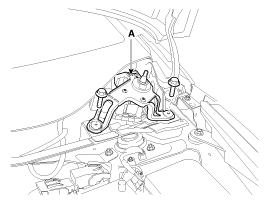
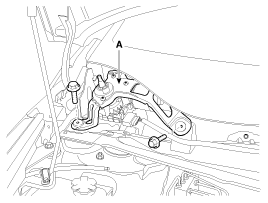
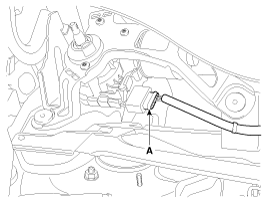
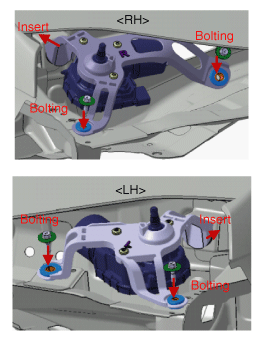
| 5. |
Remove the windshield wiper motor and linkage assembly (A) after removing
2 bolts
[Driver's Side]
[Passenger''s Side]
|
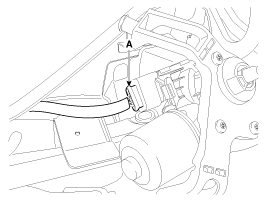
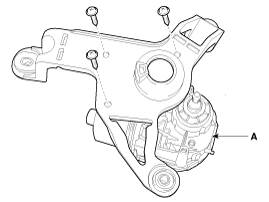
| 6. |
Disconnect the wiper motor connector (A) from the wipter motor.
[Driver's Side]
[Passenger''s Side]
|
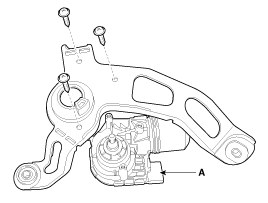
| 7. |
Reomve the wiper motor (A) after loosening the mounting screws.
[Driver's Side]
[Passenger''s Side]
|
| Installation |
| 1. |
Connect the wiper motor connector.
|
| 2. |
Insert the motor into the temporary mounting hole and assemble it by
tightening the mounting bolts.
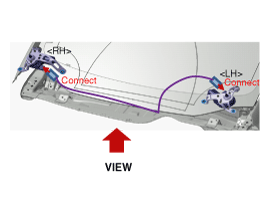
- Assemble the LH wiper motor on the left side of the vehicle and the
RH wiper motor on the right side. The letter “L” marked on the bracket
or the label “LH” attached to the motor indicates an LH motor, while
the letter “R" or the label “RH” indicates an RH motor.
|
| 3. |
Install the cowl top cover.
|
| 4. |
Install the windshield wiper arm and blade.
- If you remove a wiper arm, replace it with a new one.
- If you reassemble the removed arm, its serration wear may cause the
wiper to be set off position. If you turn on the wiper while in this
condition, some interference may occur between the blades or between
the wiper and the cowl cover or the A-pillar.
- Disconnect negative (-) battery terminal or turn the key to the “IGN
OFF” position.
Keep the ignition OFF or disconnec the negative (-) battery terminal
while working on the wiper motors to prevent the wipers from operating.
|

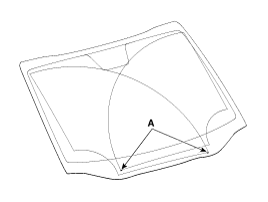
| 5. |
Install the wiper arm and blade to the specified position.
A: Blade setting position
|
| 6. |
Connect the negative (-) battery terminal.
- If the assembled wiper arm is not lined up with the mark on the windshield,
activate the opposite electronic motor wiper arm and set the blade setting
position in teach-in mode to move the wiper arm to the correct position.
(Refer to Front Wiper/ Washer - "Front Wiper Calibration")
Common sources of contamination are insects, tree sap, and hot wax treatments
used by some commercial car washes. If the blades are not wiping properly,
clean both the window and the blades with a good cleaner or mild detergent,
and rinse thoroughly with clean water.
|
| Inspection |
| 1. |
The electric control wiper (ECW) unit can be diagnosed by using the
GDS. The ECW communicates with the GDS which then displays inputs and
outputs along with codes.
|
| 2. |
To diagnose the ECW system function, select the vehicle model, BCM and
ECW system.
|
| 3. |
Select "Current Data", if you want to check current data of ECW system.
It provides input/output status of ECW.
|
 Front Wiper Motor Description and operation
Description
1.
How to diagnose a problem with wiper motors
(1)
Only the driver side wiper motor works properly.
...
 Front Wiper Motor Calibration Repair procedures
Wiper Setting Position Calibration Mode (Teach-In)
; If the assembled wiper arm is not lined up with the mark on the windshield,
activate the opposite electronic motor wiper arm and set the ...
Other information:
Kia Carens RP (2013-2018) Owners Manual: Seat
Front seat (1) Forward and backward (2) Seatback angle (3) Seat cushion height (Driver’s seat) (4) Lumbar support (Driver’s seat)* (5) Seat cushion extension* (6) Headrest 2nd row seat (7) Forward and backward (8) Seatback angle and folding (9) Walk-in seat lever* (10) Headrest (11) Center seat ...
Kia Carens RP (2013-2018) Service Manual: Engine Room Under Cover Repair procedures
Removal and Installation Engine Room Under Cover 1. Remove the engine room under cover (A). Tightening torque: 7.8 ~ 11.8 N.m (0.8 ~ 1.2 kgf.m, 5.8 ~ 8.7 lb-ft) 2. Inst ...
Copyright © www.kicaman.com 2015-2026
