Kia Carens: Manual Transaxle Control System / Control Cable Repair procedures
Kia Carens RP (2013-2018) Service Manual / Manual Transaxle System / Manual Transaxle Control System / Control Cable Repair procedures
| Removal |
| 1. |
Remove the floor console assembly.
(Refer to Body - " Floor Console")
|
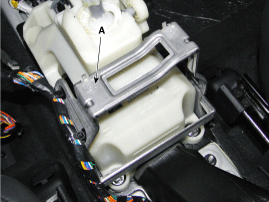
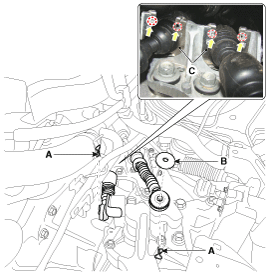
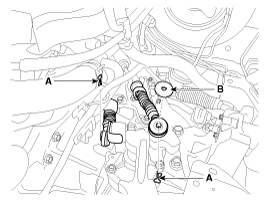
| 2. |
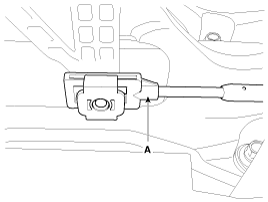
Remove the brakcet (A).
|
| 3. |
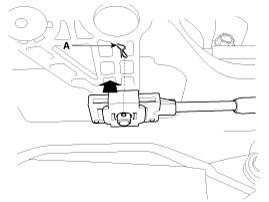
Remove the select cable (B) after removing the clip (A).
|
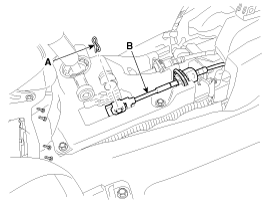
| 4. |
Remove the shift cable (A) after removing the clip.
|

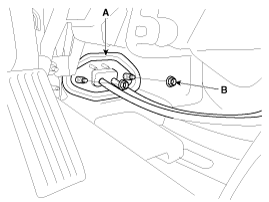
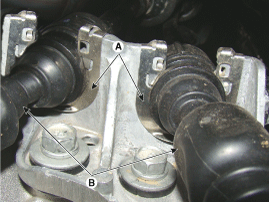
| 5. |
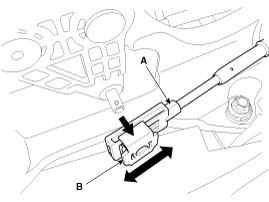
Remove the cable socket clip (A) from lever assembly after pulling in
the direction of the arrow.
|
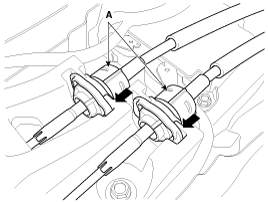
| 6. |
Remove the retainer (A) after loosen the nut (B).
|
| 7. |
Remove the air cleaner assembly.
(Refer to Engine Mechanical System - "Air Cleaner")
|
| 8. |
Remove the battery and battery tray.
(Refer to Engine Electrical System - "Battery")
|
| 9. |
Remove the shift & select cable.
|
| Installation |
When installing, set room side Shift lever and T/M side lever to N position.
|

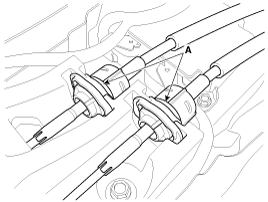
| 1. |
Install the control cable (B) and clip (A) on the bracket.
|
| 2. |
Install the control cable and then install the pin (A) and washer (B).
|
| 3. |
Tighten the nut (B) after install the retainer (A).
|
| 4. |
Install the cable socket (A) on the shift lever assembly.
|
| 5. |
Install the shift cable (A) after installing the clip.
|
| 6. |
Shift lever to "3rd".
|
| 7. |
Install the clip (A) after installing the select cable (B).
|
| 8. |
Install the floor console assembly.
(Refer to Body - "Floor Console")
|
| 9. |
Install the battery and battery tray.
(Refer to Engine Electrical System - "Battery")
|
| 10. |
Install the air cleaner assembly.
(Refer to Engine Electrical System - "Battery")
|
| Adjustment |
| Select cable adjustment |
| 1. |
Remove the select cable clip (A) and then remove the select cable (B)
from the shift lever pin.
|
| 2. |
Shift the shift lever to 3rd gear.
|
| 3. |
Move the slide clip (B) of guide member (A) in the direction as shown
in the illustration.
|
| 4. |
Install the select cable (A).
|
| 5. |
Insert the slide clip in the direction as shown in the illustration
and then install the clip (A).
|
 Control Cable Components and components location
Components
1. Knob
2. Boots
3. Shift lever assembly
4. Select cable clip
5. Shift cable clip
6. Shift cable
7. Select cable
8. Cable retain ...
 Control Shaft Complete Description and operation
Description
Component location : Control shaft assembly is mounted on the top of the manual
transaxle
Function : Change the gear by shifting a shift lever. ...
Other information:
Kia Carens RP (2013-2018) Service Manual: Inside Rear View Mirror Components and components location
Component Location 1. Inside rear view mirror ...
Kia Carens RP (2013-2018) Owners Manual: Transmitter precautions
✽ NOTICE The transmitter will not work if any of following occur: The ignition key is in ignition switch. You exceed the operating distance limit (about 10 m [30 feet]). The battery in the transmitter is weak. Other vehicles or objects may be blocking the signal. The weather is extremely col ...
Copyright © www.kicaman.com 2015-2026
