Kia Carens: Hydraulic System / Valve Body Repair procedures
Kia Carens RP (2013-2018) Service Manual / Automatic Transaxle System / Hydraulic System / Valve Body Repair procedures
| Removal |
| 1. |
Disconnect the negative (-) battery cable.
|
| 2. |
Remove the air cleaner assembly and air duct.
(Refer to Engine Mechanical System - "Air cleaner")
|
| 3. |
Remove the under cover.
(Refer to Engine Mechanical System - "Engine Room Under Cover")
|
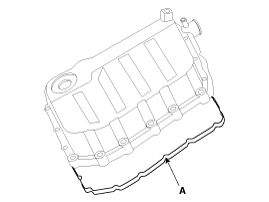
| 4. |
Replace new gasket and the plug after draining the automatic transaxle
fluid by removing the drain plug.
(Refer to Hydraulic System - "Fluid")
|
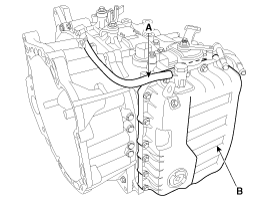
| 5. |
Remove thd air breather hose (A).
|
| 6. |
Remove the valve body cover (B).
|
| 7. |
Remove the bolt (3ea) after disconnecting the solenoid valve (B) connector
and the oil temperature sensor (A).
|

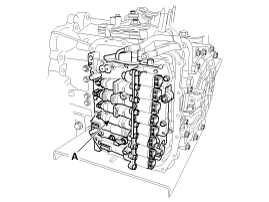
| 8. |
Remove the valve body assembly (A).
|
| Installation |
| 1. |
Install in the reverse order of removal.
|

 Valve Body Components and components location
Components Location
1. Pressure
Control Valve(PCV) adjust screw
2. Oil temperature sensor
3. Line Pressure Control Solenoid Valve
4. SS-A Solenoid Valve(ON ...
 Clutch & Brake
...
Other information:
Kia Carens RP (2013-2018) Service Manual: Rear Seat Assembly Repair procedures
Replacement [Second row seat assembly] (Except Europe and Australia) [5-seat vehicle] 1. Push the second row seat assembly (A) towards the front of the vehicle as far as possible. 2. Loosen the second row seat ...
Kia Carens RP (2013-2018) Service Manual: Alternator Description and operation
Description The Alternator has eight built-in diodes, each rectifying AC current to DC current. Therefore, DC current appears at alternator "B" terminal. In addition, the charging voltage of this alternator is regulated by the battery voltage detection system. ...
Copyright © www.kicaman.com 2015-2026
