Kia Carens: Timing System / Timing Chain Cover Repair procedures
Kia Carens RP (2013-2018) Service Manual / Engine Mechanical System / Timing System / Timing Chain Cover Repair procedures
| Removal |
|

Mark all wiring and hoses to avoid misconnection.
|

In case of removing the high pressure fuel pump, high pressure fuel
pipe, delivery pipe, and injector, there may be injury caused by leakage
of the high pressure fuel. So don’t do any repair work right after
engine stops.
|

| 1. |
Remove the drive belt.
(Refer to Timing System - "Drive Belt")
|
| 2. |
Remove the drive belt idler.
(Refer to Timing System - "Idler")
|
| 3. |
Remove the alternator.
(Refer to Engine Electrical System - "Alternator")
|
| 4. |
Remove the alternator bracket.
(Refer to Engine Electrical System - "Alternator")
|
| 5. |
Remove the engineroom under cover.
|
| 6. |
Remove the crankshaft damper pulley.
(Refer to Timing System - Crankshaft Damper Pulley")
|
| 7. |
Remove the water pump.
(Refer to Cooling System - "Water Pump")
|
| 8. |
Remove the air cleaner assembly.
(Intake and Exhaust System - "Air Cleaner")
|
| 9. |
Remove the high pressure fuel pump.
(Refer to Engine Control/Fuel System - "High Pressure Fuel Pump")
|
| 10. |
Remove the cylinder head cover.
(Refer to Cylinder Head Assembly - "Cylinder Head Cover")
|
| 11. |
Remove the engine mounting support bracket.
(Refer to Engine And Transmission Assembly - "Engine Mounting")
|
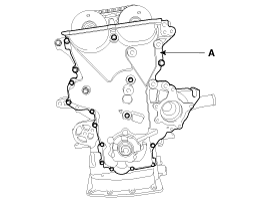
| 12. |
Remove the timing chain cover(A).
|
| Installation |
| 1. |
Install the timing chain cover.
|
| 2. |
Install in the reverse order of removal.
|
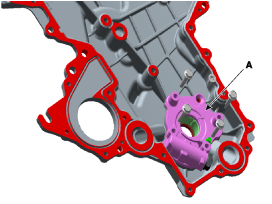
 Timing Chain Cover Components and components location
Components
1. Timing chain cover
...
 Timing Chain Components and components location
Components
1.
Timing chain
2. Timing chain guide
3.
Timing chain arm
4. Timing chain auto tensioner
...
Other information:
Kia Carens RP (2013-2018) Service Manual: Rear Seat Folding Lever Components and components location
Component Location [Second row seat assembly] (Except Europe and Australia) [5-seat vehicle] 1. Rear seat back webbing lever (For Europe and Australia) [5/7-seat vehicle] ...
Kia Carens RP (2013-2018) Owners Manual: Portable lamp usage
1. In-vehicle lamp, if necessary, after separation can be used as a portable. 2. Press the button (1). 3. Pull out the lamp holder. 4. Press the power switch (2). ❈ If the portable lamp does not turn on, it means the portable lamp needs to be charged. Insert the lamp holder and then charge it ag ...
Copyright © www.kicaman.com 2015-2026
