Kia Carens: Tail Gate / Tail Gate Latch Repair procedures
Kia Carens RP (2013-2018) Service Manual / Body (Interior and Exterior) / Tail Gate / Tail Gate Latch Repair procedures
| Replacement |
|

|

| 1. |
Remove the tail gate trim.
(Refer to Tail Gate - "Tail Gate Trim")
|
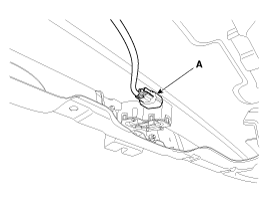
| 2. |
Disconnect the tail gate latch connector (A).
|
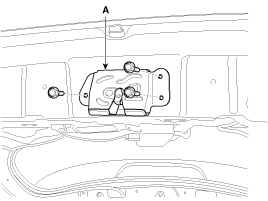
| 3. |
After loosening the mounting bolts, then remove the tail gate latch
assembly (A).
|
| 4. |
Install in the reverse order of removal.
|
 Tail Gate Latch Components and components location
Component Location
1. Tail gate latch assembly
...
 Tail Gate Back Panel Components and components location
Component Location
1. Tail gate back panel
...
Other information:
Kia Carens RP (2013-2018) Owners Manual: Low tire pressure telltale
When the tire pressure monitoring system warning indicators are illuminated, one or more of your tires is significantly under-inflated. If the telltale illuminates, immediately reduce your speed, avoid hard cornering and anticipate increased stopping distances. You should stop and check your tire ...
Kia Carens RP (2013-2018) Owners Manual: Weight of the trailer tongue
The tongue load of any trailer is an important weight to measure because it affects the total gross vehicle weight (GVW) of your vehicle. This weight includes the curb weight of the vehicle, any cargo you may carry in it, and the people who will be riding in the vehicle. And if you will tow a tr ...
Copyright © www.kicaman.com 2015-2026
