Kia Carens: Tail Gate / Tail Gate Assembly Repair procedures
Kia Carens RP (2013-2018) Service Manual / Body (Interior and Exterior) / Tail Gate / Tail Gate Assembly Repair procedures
| Replacement |
|
|
| 1. |
Remove the tail gate upper trim.
(Refer to Tail Gate - "Tail Gate Trim")
|
| 2. |
Remove the tail gate side trim.
(Refer to Tail Gate - "Tail Gate Trim")
|
| 3. |
Remove the tail gate trim.
(Refer to Tail Gate - "Tail Gate Trim")
|
| 4. |
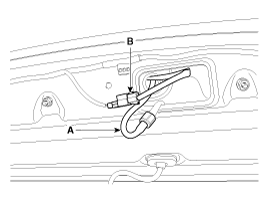
Disconnect the washer nozzle hose (A) and high mounted stop lamp connector
(B).
|
| 5. |
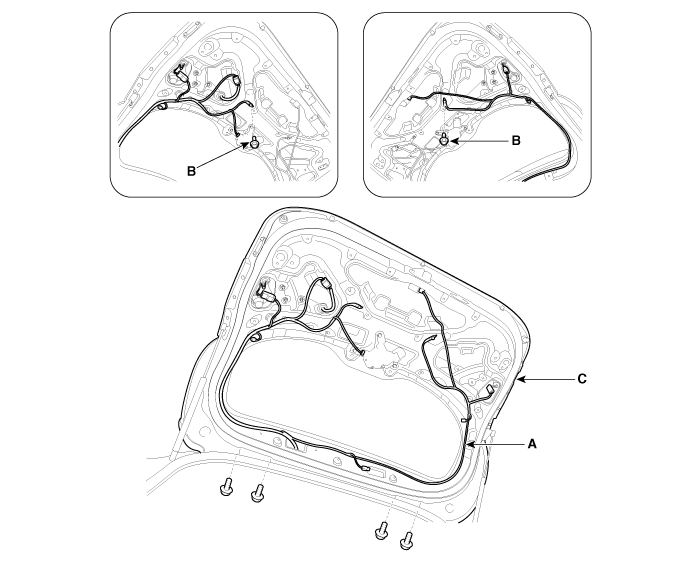
Disconnect the connectors and tail gate wiring harness (A).
|
| 6. |
Loosen the ground bolts (B).
|
| 7. |
After loosening the mounting bolts, then remove the tail gate assembly
(C).
|
| 8. |
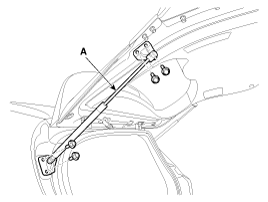
After loosening the mounting bolts, then remove the tail gate lifter
(A).
|
| 9. |
Install in the reverse order of removal.
|
 Tail Gate Assembly Components and components location
Component Location
1. Tail gate assembly
...
 Tail Gate Trim Components and components location
Component Location
1. Tail gate trim
...
Other information:
Kia Carens RP (2013-2018) Owners Manual: Checking the amount of air conditioner refrigerant and compressor lubricant
When the amount of refrigerant is low, the performance of the air conditioning is reduced. Overfilling also has a bad influence on the air conditioning system. Therefore, if abnormal operation is found, we recommend that the system be inspected by an authorized Kia dealer. WARNING - Vehicles equip ...
Kia Carens RP (2013-2018) Owners Manual: Driving in the rain
Rain and wet roads can make driving dangerous, especially if you’re not prepared for the slick pavement. Here are a few things to consider when driving in the rain: A heavy rainfall will make it harder to see and will increase the distance needed to stop your vehicle, so slow down. Keep your ...
Copyright © www.kicaman.com 2015-2026


