Kia Carens: Front Suspension System / Front Strut Assembly Repair procedures
Kia Carens RP (2013-2018) Service Manual / Suspension System / Front Suspension System / Front Strut Assembly Repair procedures
| Replacement |
| 1. |
Loosen the wheel nuts slightly.
Raise the vehicle, and make sure it is securely supported.
|
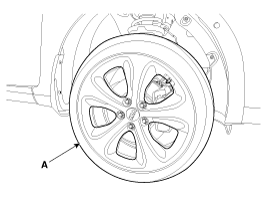
| 2. |
Remove the front wheel and tire (A) from front hub.
|

| 3. |
Remove the wheel speed sensor (A) bracket from the front strut assembly
by loosening the mounting bolts (B).
|
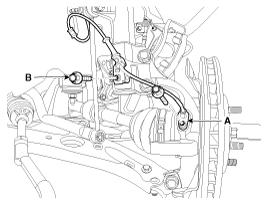
| 4. |
Disconnect the stabilizer link (A) from the front strut assembly after
loosening the nut.
|

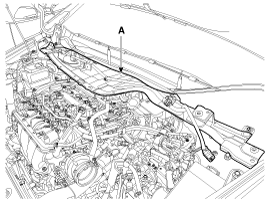
| 5. |
Remove the cowl top cover (A).
(Refer to Body - "Cowl Top Cover")
|
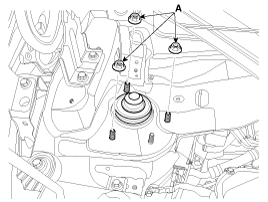
| 6. |
Remove the cowl panell (A).
|
| 7. |
Remove the front strut assembly and then loosen the strut mounting nuts
(A).
|
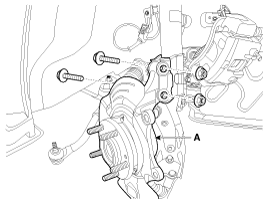
| 8. |
Disconnect the front strut assembly (A) from the knuckle by loosening
the bolt & nut.
|
| 9. |
Installation is the reverse of removal.
|
| Disassembly |
| 1. |
Using a strut spring compressor, compress the coil spring (A).
|
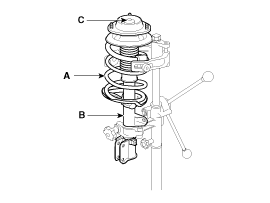

| 2. |
Remove the self-locking nut (C) from the strut assembly (B).
|
| 3. |
Remove the insulator, spring seat, coil spring and dust cover from the
strut assembly.
|
| 4. |
Reassembly is the reverse of the disassembly.
|
| Inspection |
| 1. |
Check the strut bearing for wear and damage.
|
| 2. |
Check the spring upper and lower seat for damage and deterioration.
|
| 3. |
Compress and extend the piston rod (A) and check that there is no abnormal
resistance or unusual sound during operation.
|

Disposal
| 1. |
Fully extend the piston rod.
|
| 2. |
Drill a hole on the (A) section to remove gas from the cylinder.
|

 Front Strut Assembly Components and components location
Components
1. Strut assembly
2. Insulator
3. Strut bearing
4. Spring upper pad
5. Coil spring
6. Dust cover
7. Bumper rubber
8. Spring lowe ...
 Front Lower Arm Repair procedures
Replacement
1.
Loosen the wheel nuts slightly.
Raise the vehicle, and make sure it is securely supported.
2.
Remove the front w ...
Other information:
Kia Carens RP (2013-2018) Service Manual: ESP Control Module Components and components location
Components 1. Front - left tube 2. Rear - right tube 3. Rear - left tube 4. Front - right tube 5. MC2 6. MC1 7. ESP control module(HECU) 8. Damper 9. Bracket ...
Kia Carens RP (2013-2018) Owners Manual: Rear parking assist system
The rear parking assist system assists the driver during backward movement of the vehicle by chiming if any object is sensed within a distance of 120 cm (47 in.) behind the vehicle. This system is a supplemental system and it is not intended to nor does it replace the need for extreme care and a ...
Copyright © www.kicaman.com 2015-2026
