Kia Carens: Front Seat / Front Seat Shield Outer Cover Repair procedures
| [Front seat shield front cover] |
| • |
Put on gloves to protect your hands.
|
|
| • |
When prying with a flat-tip screwdriver, wrap it with protective
tape, and apply protective tape around the related parts, to
prevent damage.
|
| • |
Use a plastic panel removal tool to remove interior trim pieces
to protect from marring the surface.
|
| • |
Take care not to bend or scratch the trim and panels.
|
|
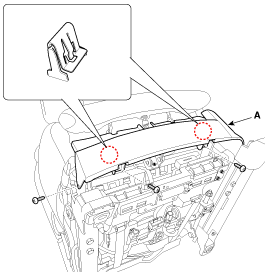
| 1. |
Remove the front seat assembly.
(Refer to Front Seat - "Front Seat Assembly")
|
| 2. |
After loosening the mounting screws, then remove the front seat shield
front cover (A).
|
| 3. |
Install in the reverse order of removal.
| •
|
Replace any damaged clips.
|
|
|
[Front seat shield outer cover]
| • |
Put on gloves to protect your hands.
|
|
| • |
When prying with a flat-tip screwdriver, wrap it with protective
tape, and apply protective tape around the related parts, to
prevent damage.
|
| • |
Use a plastic panel removal tool to remove interior trim pieces
to protect from marring the surface.
|
| • |
Take care not to bend or scratch the trim and panels.
|
|
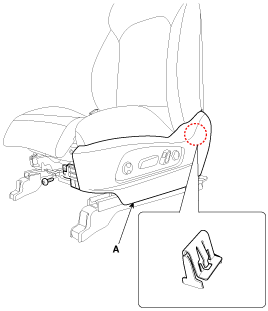
| 1. |
Remove the front seat shield front cover.
|
| 2. |
After loosening the mounting screw, then remove the front seat shield
outer cover (A).
|
| 3. |
Disconnect the front seat power switch connector (A).
|
| 4. |
Install in the reverse order of removal.
| •
|
Make sure the connector is plugged in properly.
|
| •
|
Replace any damaged clips.
|
|
|
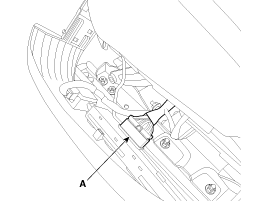
Component Location
1. Front seat shield front cover
2. Front seat shield outer cover
...
Component Location
1. Front seat shield inner cover
...
Other information:
Components
1. LDWS ON/OFF switch
2. Instrument cluster
3. LDWS unit
...
Troubleshooting
Problem Symptoms Table
Use the table below to help you find the cause of the problem. The numbers indicate
the priority of the like cause of the problem. Check each part in order.
If necessary, replace these parts.
Symptom
...


 Front Seat Shield Outer Cover Components and components location
 Front Seat Shield Inner Cover Components and components location