Kia Carens: Tail Gate / Tail Gate Trim Repair procedures
Kia Carens RP (2013-2018) Service Manual / Body (Interior and Exterior) / Tail Gate / Tail Gate Trim Repair procedures
| Replacement |
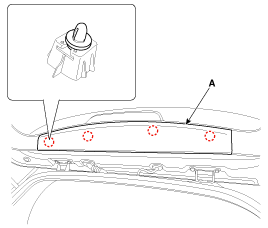
[Tail gate upper trim]
|

|

| 1. |
Using a screwdriver or remover, remove the tail gate upper trim (A).
|
| 2. |
Install in the reverse order of removal.
|

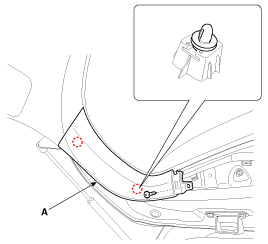
[Tail gate side trim]
|
|
| 1. |
Remove the tail gate upper trim.
|
| 2. |
After loosening the mounting screw, then remove the tail gate side trim
(A).
|
| 3. |
Install in the reverse order of removal.
|
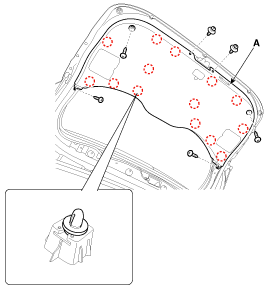
[Tail gate trim]
|
|
| 1. |
Remove the tail gate upper trim.
|
| 2. |
Remove the tail gate side trim.
|
| 3. |
Using a flat-tip screwdriver, push the locking pin (A) and then remove
the tail gate inside handle (B).
|

| 4. |
After loosening the mounting clips and screws, then remove the tail
gate trim (A).
|
| 5. |
Install in the reverse order of removal.
|
 Tail Gate Trim Components and components location
Component Location
1. Tail gate trim
...
 Tail Gate Latch Components and components location
Component Location
1. Tail gate latch assembly
...
Other information:
Kia Carens RP (2013-2018) Service Manual: Repair procedures
Inspection 1. Remove the ISG switch from the switch assembly. 2. Check the continuity between the switch 5 and 12 terminals as the ISG OFF switch is engaged. ...
Kia Carens RP (2013-2018) Owners Manual: Removing and storing the spare tire
Your spare tire is stored underneath your vehicle, directly below the cargo area. To remove the spare tire: 1. Open the tailgate and luggage under tray cover. 2. Find the plastic hex bolt cover (1) and remove the cover. 3. Connect the socket and wheel lug nut wrench. 4. Use the wheel lug nut wrenc ...
Copyright © www.kicaman.com 2015-2026
