Kia Carens: Crash Pad / Steering Column Shroud Panel Repair procedures
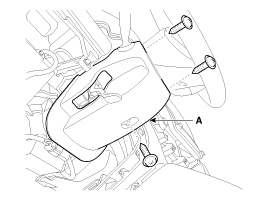
[Steering column shroud lower panel]
| • |
Put on gloves to protect your hands.
|
|
| • |
When prying with a flat-tip screwdriver, wrap it with protective
tape, and apply protective tape around the related parts, to
prevent damage.
|
| • |
Use a plastic panel removal tool to remove interior trim pieces
to protect from marring the surface.
|
| • |
Take care not to bend or scratch the trim and panels.
|
|
| 1. |
Remove the crash pad lower panel.
(Refer to Crash Pad - "Crash Pad Lower Panel")
|
| 2. |
After loosening the mounting screws, then remove the steering column
shroud lower panel (A).

|
| 3. |
Install in the reverse order of removal.
| •
|
Replace any damaged clips.
|
|
|
[Steering column shroud upper panel]
| • |
Put on gloves to protect your hands.
|
|
| • |
When prying with a flat-tip screwdriver, wrap it with protective
tape, and apply protective tape around the related parts, to
prevent damage.
|
| • |
Use a plastic panel removal tool to remove interior trim pieces
to protect from marring the surface.
|
| • |
Take care not to bend or scratch the trim and panels.
|
|
| 1. |
Remove the cluster fascia panel.
(Refer to Crash Pad - "Cluster Fascia Panel")
|
| 2. |
Install in the reverse order of removal.
| •
|
Replace any damaged clips.
|
|
|
Component Location
1. Steering column shroud lower
panel
2. Steering column shroud upper
panel
...
Component Location
[LH]
1. Crash pad side cover [LH]
[RH]
1. Crash pad side cover [RH]
...
Other information:
Removal
1.
Turn the ignition switch OFF and disconnect the battery negative (-)
cable.
2.
Remove the intake manifold. (Refer to Engine Mechanical System - "Intake
manifold")
3.
Disconn ...
Inspection
Rain Sensing Wiper
1.
In IGN2 ON state, if auto switch input (LIN communication) is ON then
both wiper low relay and wiper high relay outputs are controlled by
the rain sensor input signal.
2.
If the wiper switc ...
 Steering Column Shroud Panel Components and components location
 Crash Pad Side Cover Components and components location


