Kia Carens: ESP(Electronic Stability Program) System / Yaw-rate and G Sensor Repair procedures
Kia Carens RP (2013-2018) Service Manual / Brake System / ESP(Electronic Stability Program) System / Yaw-rate and G Sensor Repair procedures
| Removal |
| 1. |
Turn ignition switch OFF and disconnect the negative (-) battery cable.
|
| 2. |
Pull the passenger seat towards the front till the end.
|
| 3. |
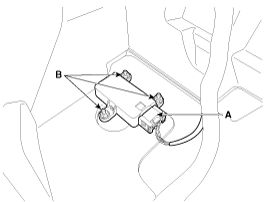
Disconnect the yaw rate & lateral G sensor connector (A).
|
| 4. |
Remove the mounting bolts (B).
|
| 5. |
Install in the reverse order of removal.
|
| G-Sensor Calibration |
| 1. |
Ignition "OFF", connect GDS.
|
| 2. |
Ignition "ON" & Engine "OFF" select vehicle name and ESP system.
|
| 3. |
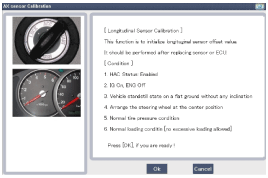
Perform G-sensor calibration.
|
| 4. |
After G-sensor calibration of ESP, enter into EPB system.
|
| 5. |
Perform G-Sensor Calibration.
|
| 6. |
Perform the " G-Sensor Calibration " procedure with GDS.
|
| 7. |
Complete the “G-Sensor Calibration” procedure.
|
 Yaw-rate and G Sensor Description and operation
Description
When the vehicle is turning with respect to a vertical axis the yaw rate sensor
detects the yaw rate electroniclly by the vibration change of plate fork inside
the ya ...
 ESP OFF Switch Description and operation
Description
1.
The ESP OFF switch is for the user to turn off the ESP system.
2.
The ESP OFF lamp is on when ESP OFF switch is engaged. ...
Other information:
Kia Carens RP (2013-2018) Owners Manual: Key operations
Used to start the engine. Used to lock and unlock the doors. WARNING We recommend that you use parts for replacement from an authorized Kia dealer. If an aftermarket key is used, the ignition switch may not return to ON after START. If this happens, the starter will continue to operate causing ...
Kia Carens RP (2013-2018) Service Manual: Cylinder Block Components and components location
Components 1. Cylinder block 2. Ladder frame 3. Crank shaft 4. Crank shaft upper bearing 5. Crank shaft lower bearing 6. Thrust bearing 7. Main bearing cap 8. Crank shaft sproket ...
Copyright © www.kicaman.com 2015-2026


