Kia Carens: Roof Trim / Roof Trim Assembly Repair procedures
Kia Carens RP (2013-2018) Service Manual / Body (Interior and Exterior) / Roof Trim / Roof Trim Assembly Repair procedures
| Replacement |
|

|

| 1. |
Remove the third row seat.
(Refer to Rear Seat - "Rear Seat Assembly")
|
| 2. |
Remove the front pillar trim.
(Refer to Interior Trim - "Front Pillar Trim")
|
| 3. |
Remove the canter pillar upper trim.
(Refer to Interior Trim - "Center Pillar Trim")
|
| 4. |
Remove the rear pillar trim.
(Refer to Interior Trim - "Rear Pillar Trim")
|
| 5. |
Remove the sunvisor and retainer.
(Refer to Roof Trim - "Sunvisor")
|
| 6. |
Remove the assist handle.
(Refer to Roof Trim - "Assist Handle")
|
| 7. |
Remove the overhead console lamp.
(Refer to Body Electrical System - "Overhead Console Lamp")
|
| 8. |
Remove the room lamp.
(Refer to Body Electrical System - "Room Lamp")
|
| 9. |
Tilt the front seat back towards the rear of the vehicle as far as possible.
|
| 10. |
Fold the second row seat after pushing it towards the front of the vehicle
as far as possible.
|
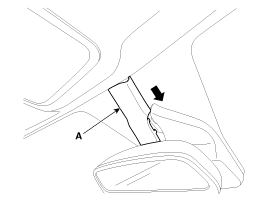
| 11. |
Remove the ECM mirror cover (A).
|
| 12. |
Disconnect the ECM mirror connector (B).
|

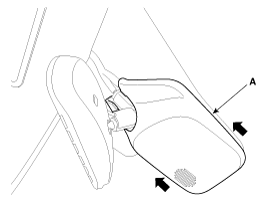
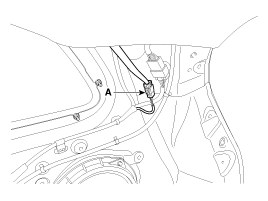
| 13. |
Push the ECM mirror base up to remove the auto defog sensor & rain sensor
cover (A).
|
| 14. |
Disconnect the auto defog sensor connector (A) and rain sensor connector
(B).
|
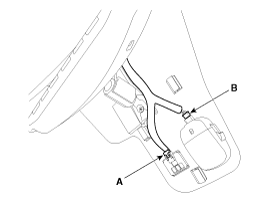
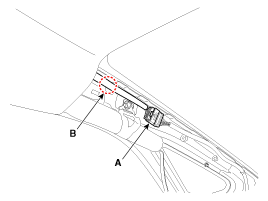
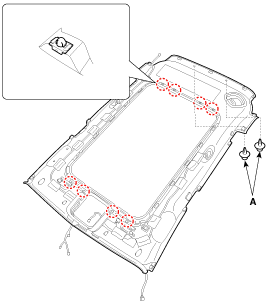
| 15. |
Disconnect the roof trim main connector (A) and the mounting clips (B)
in the front pillar.
[Driver's]
[Passenger's]
|
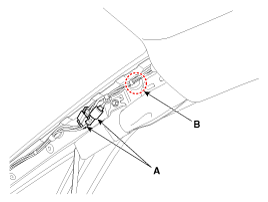
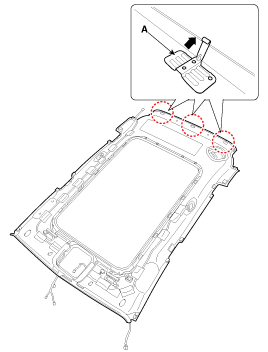
| 16. |
Disconnect the roof antenna connector (A) and the mounting clips in
the rear pillar.
[RH]
|
| 17. |
Push the lower anchor (A) of second center row seat belt into the second
center row seat belt cover.
|
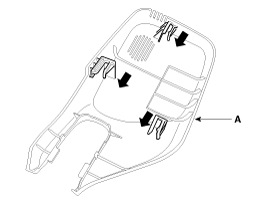
| 18. |
Using a clip remover, detach the roof trim assembly mounting clips (A).
|
| 19. |
Slighty remove the tail gate weatherstrip.
|
| 20. |
Slightly lower the rear side of the roof trim.
|
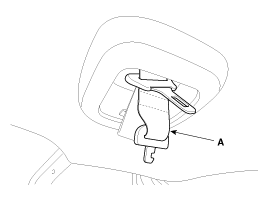
| 21. |
To remove the roof trim, press the lock pin (A) in the direction of
the arrow.
|
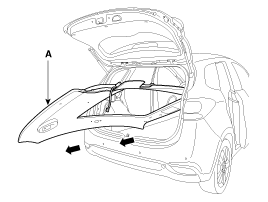
| 22. |
Remove the roof trim assembly (A) from the vehicle through the tail
gate.
|
| 23. |
Remove the vanity lamp.
(Refer to Body Electrical System - "Vanity Lamp")
|
| 24. |
Remove the hands free mic.
(Refer to Body Electrical System - "Hands Free Mic")
|
| 25. |
Remove roof trim wiring harness (A) from the roof trim assembly (B).
|

| 26. |
Install in the reverse order of removal.
|
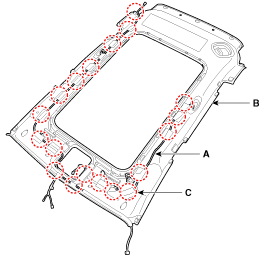
 Roof Trim Assembly Components and components location
Component Location
1. Roof Trim Assembly
...
 Interior Trim
...
Other information:
Kia Carens RP (2013-2018) Owners Manual: Door lock/unlock features
Impact sensing door unlock system All doors will automatically unlock when an impact causes the air bags to deploy. Speed sensing door lock system (if equipped) All doors will automatically lock after the vehicle speed exceeds 15 km/h. Engine off door unlock system (if equipped) All doors will autom ...
Kia Carens RP (2013-2018) Service Manual: Repair procedures
Replacement 1. Loosen the wheel nuts slightly. Raise the vehicle, and make sure it is securely supported. 2. Remove the front wheel and tire (A) from front hub . Tightening torque: 88.3 ...
Copyright © www.kicaman.com 2015-2026
