Kia Carens: Floor Carpet / Repair procedures
Kia Carens RP (2013-2018) Service Manual / Body (Interior and Exterior) / Floor Carpet / Repair procedures
| Replacement |
|

|

| 1. |
Remove the floor console assembly.
(Refer to Floor Console - "Floor Console Assembly")
|
| 2. |
Remove the front seat assembly.
(Refer to Front Seat - "Front Seat Assembly")
|
| 3. |
Remove the second row seat.
(Refer to Rear Seat - "Rear Seat Assembly")
|
| 4. |
Remove the third row seat.
(Refer to Rear Seat - "Rear Seat Assembly")
|
| 5. |
Remove the center pillar lower trim.
(Refer to Interior Trim - "Center Pillar Trim")
|
| 6. |
Remove the cowl side trim.
(Refer to Interior Trim - "Cowl Side Trim")
|
| 7. |
Remove the luggage side trim.
(Refer to Interior Trim - "Luggage Side Trim")
|
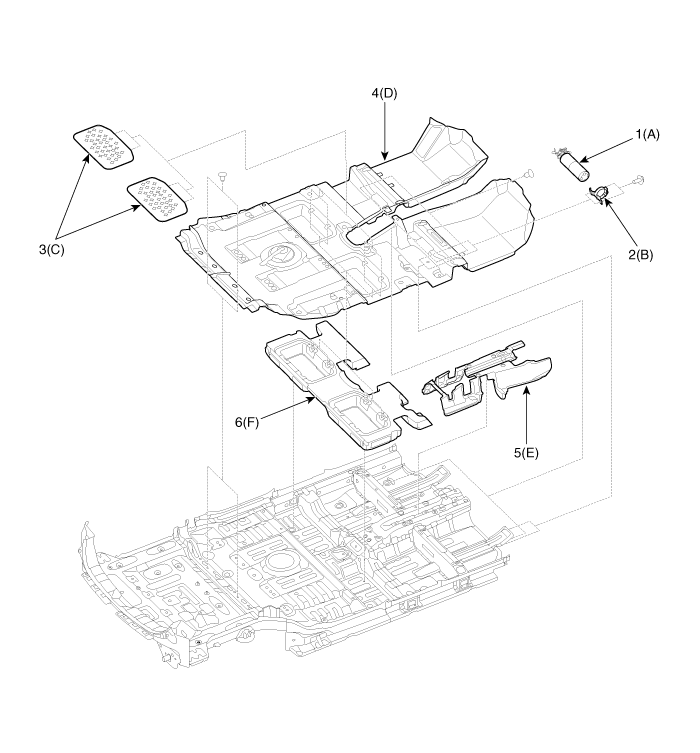
| 8. |
Remove the fire extinguisher (A).
|
| 9. |
Remove the fire extinguisher brackat (B).
|
| 10. |
Remove the under tray cover (C).
|
| 11. |
Remove the floor carpet assembly (D).
|
| 12. |
Remove the tunnel rear pad (E).
|
| 13. |
Remove the side sill rear pad (F).
|
| 14. |
Install in the reverse order of removal.
|

 Floor Carpet
...
 Front Bumper
...
Other information:
Kia Carens RP (2013-2018) Owners Manual: Fuel Gauge
This gauge indicates the approximate amount of fuel remaining in the fuel tank. ✽ NOTICE The fuel tank capacity is given in chapter 9. The fuel gauge is supplemented by a low fuel warning light, which will illuminate when the fuel tank is nearly empty. On inclines or curves, the fuel gauge ...
Kia Carens RP (2013-2018) Service Manual: Rear Seat Belt Buckle Repair procedures
Replacement [Second row seat belt buckle] (Except Europe and Australia) [5-seat vehicle] 1. Remove the second row seat assembly. (Refer to Rear Seat - "Rear Seat Assembly") 2. Remove the rear sea ...
Copyright © www.kicaman.com 2015-2026
