Kia Carens: Hood / Hood Assembly Repair procedures
| • |
Be careful not to damage the hood and body.
|
|
| • |
When removing and installing the hood, an assistant is necessary.
|
| • |
When removing the clips, use a clip remover.
|
|
| 1. |
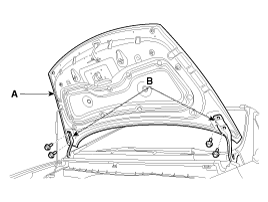
After loosening the hood hinge (B) mounting bolts, remove the hood assembly
(A).
|
Tightening torque :
21.6~26.5 N.m (2.2~2.7 kgf.m, 15.9~19.5 lb-ft)
|

|
| 2. |
Install in the reverse order of removal.
| •
|
Make sure the hood locks/unlocks and opens/closes properly.
|
| •
|
Adjust the hood alignment.
|
|
|
Component Location
1. Hood assembly
...
Replacement
1.
Using a clip remover, detach the clips, and remove the hood insulator
pad (A).
...
Other information:
Removal
1.
Remove the ignition key from the vehicle.
2.
Disconnect the battery negative cable and wait for at least three minutes
before beginning work.
3.
Remove the crash pad side cover.
( ...
Replacement
•
Put on gloves to protect your hands.
•
When ...
 Hood Assembly Components and components location
 Hood Insulator Pad Repair procedures


