Kia Carens: Timing System / Drive Belt Repair procedures
Kia Carens RP (2013-2018) Service Manual / Engine Mechanical System / Timing System / Drive Belt Repair procedures
| Removal |
| 1. |
Disconnect the battery negative terminal.
|
| 2. |
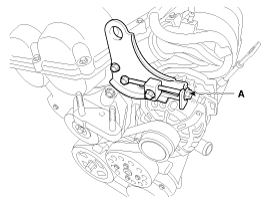
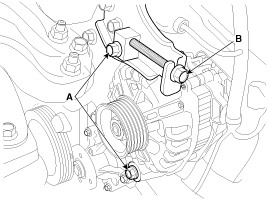
Loosen the alternator tension adjusting bolt (A) to loosen tension.
|
| 3. |
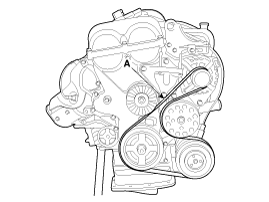
Remove the drive belt (A).
|
| Inspection |
Drive Belt Inspection
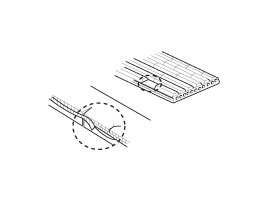
Visually check the belt for excessive wear, frayed cords etc.
If any defect has been found, replace the drive belt.
Cracks on the rib side of a belt are considered acceptable. If the belt
has chunks missing from the ribs, it should be replaced.
|
| Adjustment |
Drive belt tension measurement and adjustment
| Belt tension measurement |
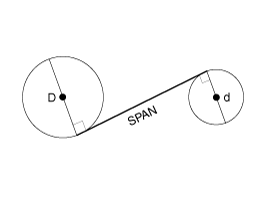
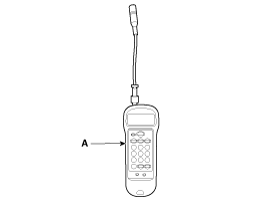
Measure the belt tension using a mechanical tension gauge or a sonic tension
meter.
|
Tension
New belt: 686.5 ~ 784.5N (70 ~ 80kg, 154.3 ~ 176.4lb)
Used belt: 490.3 ~ 588.4N (50 ~ 60kg, 110.2 ~ 132.3lb)
|
|
| Using a mechanical tension gauge |
| 1. |
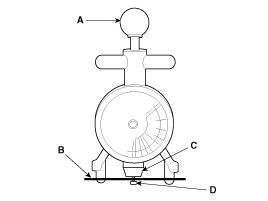
While pressing the handle (A) of the gauge, insert the belt (B) between
pulley and pulley (or idler) into the gap between spindle (C) and hook
(D).
|
| 2. |
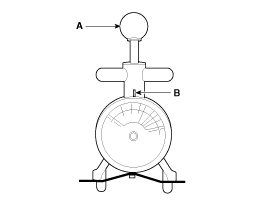
After releasing the handle (A), read a value on the dial pointed by
the indicator (B).
|
| Using a sonic tension meter |
| 1. |
Input the belt specifications into the tension meter.
|
||||||||||||||||||||||
| 2. |
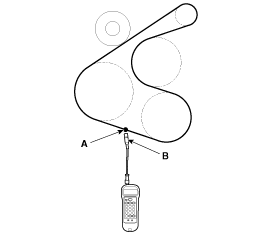
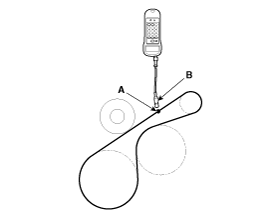
Locate the micro phone (B) close to the center of belt span (A) and
bounce the belt by finger 2~3 times. Read a value on the display.
[With A/C]
[Without A/C]
|
| If adjustment is necessary: |
| 1. |
Loosen the mounting bolts (A).
|
| 2. |
Tighten the adjusting bolt(B) clockwise in loose tension ; loosen the
bolt counterclockwise in high tension.
|
| 3. |
Recheck tension of the belt.
|
| 4. |
After adjusting tension, tighten the through bolts.
|
| Installation |
| 1. |
Install the drive belt (A).
|
| 2. |
Adjust tension by tightening the alternator tension adjust bolt (B)
and then install the mounting bilts(A).
|
| 3. |
Connect the battery negative terminal.
|
 Drive Belt Components and components location
Components
1. Drive belt
...
 Idler Components and components location
Components
1. Idler
...
Other information:
Kia Carens RP (2013-2018) Service Manual: Schematic diagrams
Schematic Diagram Canister Canister is filled with charcoal and absorbs evaporated vapor in fuel tank. The gathered fuel vapor in canister is drawn into the intake manifold by the ECM/PCM when appropriate conditions are set. Purge Control Solenoid Valve (PCSV) ...
Kia Carens RP (2013-2018) Service Manual: Troubleshooting
Troubleshooting Problem Symptoms Table Before replacing or repairing air conditioning components, first determine if the malfunction is due to the refrigerant charge, air flow or compressor. Use the table below to help you find the cause of the problem. The numb ...
Copyright © www.kicaman.com 2015-2026


