
Kia Carens: Charging System / DC DC converter Repair procedures
Kia Carens RP (2013-2018) Service Manual / Engine Electrical System / Charging System / DC DC converter Repair procedures
| Removal |
[200W]
| 1. |
Disconnect the battery negative terminal.
|
| 2. |
Remove the crash pad lower panel.
(Refer to Body - "Crash Pad Lower Panel")
|
| 3. |
Remove the steering column shroud lower panel.
(Refer to Body - "Steering Column Shroud Panel")
|
| 4. |
Disconnect the DC/DC converter conector.
|
| 5. |
Remove the DC/DC converter (A) after removing nuts (B).
|
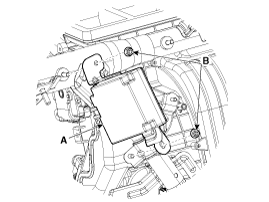
[400W]
| 1. |
Disconnect the battery negative terminal.
|
| 2. |
Remove the front drive seat.
(Refer to Body - "Front Seat)
|
| 3. |
Open the floor matt.
|
| 4. |
Disconnect the DC/DC converter conector (A).
|
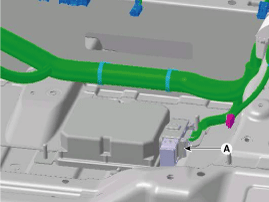
| 5. |
Remove the DC/DC converter (A) after removing nuts (B).
|
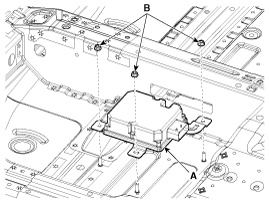
| Installation |
| 1. |
Install in the reverse order of removal.
|

 DC DC converter Schematic diagrams
Circuit Diagram
...
 Battery Description and operation
Description
1.
The MF(Maintenance Free) battery is, as the name implies, totally maintenance
free and has no removable battery cell caps.
2.
...
Other information:
Kia Carens RP (2013-2018) Owners Manual: Explanation of scheduled maintenance items
Engine oil and filter The engine oil and filter should be changed at the intervals specified in the maintenance schedule. If the car is being driven in severe conditions, more frequent oil and filter changes are required. Drive belts Inspect all drive belts for evidence of cuts, cracks, excessive ...
Kia Carens RP (2013-2018) Owners Manual: With the door handle (Type B)
To unlock a door, push the door lock button (1) to the “Unlock (A)” position. The red mark (2) on the button will be visible. To lock a door, push the door lock button (1) to the “Lock (B)” position. If the door is locked properly, the red mark (2) on the door lock button will not ...
Copyright © www.kicaman.com 2015-2026
