Kia Carens: Airbag Module / Curtain Airbag (CAB) Module Repair procedures
Kia Carens RP (2013-2018) Service Manual / Restraint / Airbag Module / Curtain Airbag (CAB) Module Repair procedures
| Removal |
| 1. |
Disconnect the battery negative cable and wait for at least thirty seconds
before beginning work.
|
| 2. |
Remove the roof trim assembly.
(Refer to Body - "Roof trim assembly")
|
| 3. |
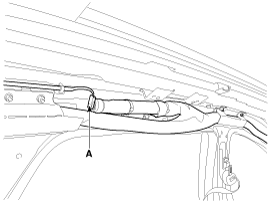
Disconnect the curtain airbag harness connector (A).
|
| 4. |
After loosening the mounting bolts and nuts remove the curtain airbag.
|
| Installation |
| 1. |
Remove the ignition key from the vehicle.
|
| 2. |
Disconnect the battery negative cable and wait for at least thirty seconds.
|
| 3. |
Tighten the curtain airbag mounting bolts and nuts.
|
| 4. |
Connect the curtain airbag connector.
|
| 5. |
Install the roof trim assembly.
(Refer to Body - "Roof trim assembly")
|
| 6. |
Reconnect the battery negative cable.
|
| 7. |
After installing the curtain airbag (CAB), confirm proper system operation:
|
 Airbag Module Disposal Description and operation
Airbag Disposal
Special tool required
Deployment tool 0957A-34100A
Before scrapping any airbags or side airbags (including those in a whole vehicle
to be scrapped ...
Other information:
Kia Carens RP (2013-2018) Owners Manual: Transaxle ranges
The indicator lights in the instrument cluster displays the shift lever position when the ignition switch is in the ON position. P (Park) Always come to a complete stop before shifting into P (Park). This position locks the transaxle and prevents the front wheels from rotating. WARNING Shifting ...
Kia Carens RP (2013-2018) Service Manual: External Amplifier Components and components location
Components Connector Pin Information No. Connector A (26 pin) Connector B (16 pin) Connector C (12 pin) 1 Battery (+) - Rear right door speaker (+) 2 ...
Copyright © www.kicaman.com 2015-2026


