Kia Carens: Interior Trim / Cowl Side Trim Repair procedures
Kia Carens RP (2013-2018) Service Manual / Body (Interior and Exterior) / Interior Trim / Cowl Side Trim Repair procedures
| Replacement |
|

|

| 1. |
Remove the front door scuff trim.
(Refer to Interior Trim - "Door Scuff Trim")
|
| 2. |
Remove the hood latch release handle.
(Refer to Hood - "Hood Latch Release Handle")
|
| 3. |
Slighty remove the front door body side weatherstrip.
|
| 4. |
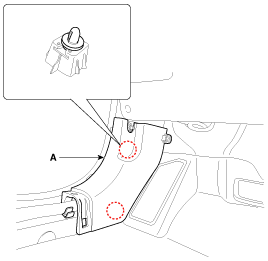
Using a screwdriver or remover, remove the cowl side trim (A).
|
| 5. |
Install in the reverse order of removal.
|

 Cowl Side Trim Components and components location
Component Location
1. Cowl side trim
...
 Front Pillar Trim Components and components location
Component Location
1. Front pillar trim
...
Other information:
Kia Carens RP (2013-2018) Service Manual: Special service tools
Special Service Tools Tool(Number and Name) Illustration Use 09581-11000 Piston expander Spreading the front and rear disc brake piston. 09580-0U000 Brake piston adjuster ...
Kia Carens RP (2013-2018) Service Manual: ESP OFF Switch Repair procedures
Removal 1. Disconnect the negative (-) battery terminal. 2. Using a screwdriver or remover, remove the crash pad side cover [LH] (A). 3. Remove the lower crash pad switch assembly (A) by pushi ...
Copyright © www.kicaman.com 2015-2026
