
Kia Carens: Air conditioning System / A/C Pressure Transducer Repair procedures
Kia Carens RP (2013-2018) Service Manual / Heating,Ventilation And Air Conditioning / Air conditioning System / A/C Pressure Transducer Repair procedures
| Inspection |
| 1. |
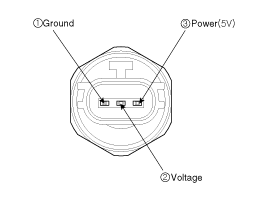
Measure the pressure of high pressure line by measuring voltage output
between terminal “1” and “2”.
|
| 2. |
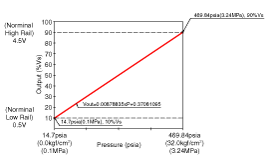
Inspect the voltage value whether it is sufficient to be regular value
or not.
|
| 3. |
If the measured voltage value is not wihtin specification, replace the
A/C pressure transducer.
|
| Replacement |
| 1. |
Disconnect the negative (-) battery terminal.
|
| 2. |
Recover the refrigerant with a recovery/charging station.
|
| 3. |
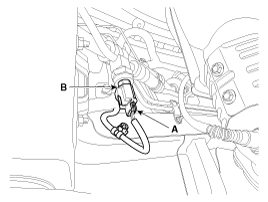
Disconnect the A/C pressure transducer connector (A).
|
| 4. |
Remove the A/C pressure transducer (B).
|

| 5. |
Install in the reverse order of removal.
|

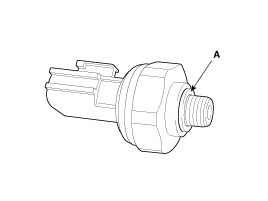
 A/C Pressure Transducer Description and operation
Description
The A/C Pressure Transducer (APT) converts the pressure value of high pressure
line into voltage value after measuring it. By converted voltage value, engine
ECU cont ...
 Evaporator Temperature Sensor Description and operation
Description
The evaporator temperature sensor will detect the evaporator core temperature
and interrupt compressor relay power in order to prevent evaporator from freezing
by exc ...
Other information:
Kia Carens RP (2013-2018) Service Manual: Specifications
Specifications Audio Head Unit Item Specification Model RADIO/CD/MP3 (PA30A) RADIO/CD/MP3 (PA30B) RADIO/CD/MP3/RDS (PA30A R) RADIO/CD/MP3/RDS (PA30B R) Power supply ...
Kia Carens RP (2013-2018) Service Manual: Specifications
Specifications Items Specification Hood Type Rear hinged, Front opening type, Stay type Front Door Construction Front hinged, frame door construction Regulat ...
Copyright © www.kicaman.com 2015-2026
