Kia Carens: SRSCM / Side Impact Sensor (SIS) Repair procedures
| Pressure Side Impact Sensor |
| • |
Removal of the airbag must be performed according to the precautions/procedures
described previously.
|
| • |
Before disconnecting the side impact sensor connector(s), disconnect
the side airbag connector(s).
|
| • |
Do not turn the ignition switch ON and do not connect the battery
cable while replacing the side impact sensor.
|
|
| 1. |
Disconnect the battery negative cable, and wait for at least three minutes
before beginning work.
|
| 2. |
Remove the front door trim.
(Refer to Body - "Front door trim")
|
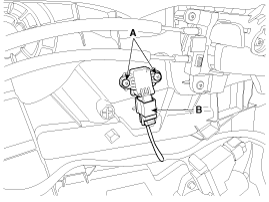
| 3. |
Disconnect the pressure side impact sensor connector (B) and remove
the pressure side impact sensor mounting screws (A).
|
Side Impact Sensor
| 1. |
Disconnect the battery negative cable and wait for at least three minutes
before beginning work.
|
| 2. |
Remove the door scuff trim.
(Refer to Body - "Door scuff trim")
|
| 3. |
Remove the center pillar lower trim.
(Refer to Body - "Center pillar trim")
|
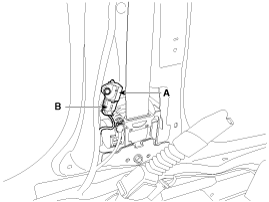
| 4. |
Disconnect the side impact sensor connector (B).
|
| 5. |
Loosen the side impact sensor mounting bolt and remove the side impact
sensor (A).
|
| Pressure Side Impact Sensor |
| 1. |
Install the new pressure side impact sensor with the screws (A) then
connect the pressure side impact sensor connector (B).
|
Tightening torque :
3.5 ~ 5.7 N.m (0.36 ~ 0.58 kgf.m, 2.6 ~ 4.2 lb-ft)
|
|
| 2. |
Install the front door trim.
(Refer to Body - "Front door trim")
|
| 3. |
Reconnect the battery negative cable.
|
| 4. |
After installing the pressure side impact sensor, confirm proper system
operation:
| • |
Turn the ignition switch ON; the SRS indicator light should
be turned on for about six seconds and then go off.
|
| •
|
You must comply with the specified tightening torques
with the tool specified because Pressure – Side Impact
Sensors (P-SIS) may be broken or screw gromment may
be rotated.
|
| •
|
Problems may be occurred in the durability of P-SIS
or impact sensing performance may be depreciated if
screw gromment is rotated.
|
| •
|
The door module must not be transformed because SRSCM
judges a impact through the pressure sensor in the door
module.
|
|
|
Side Impact Sensor
| • |
Do not turn the ignition switch ON and do not connect the battery
cable while replacing the side impact sensor.
|
|
| 1. |
Install the new side impact sensor (A) with the bolt then connect the
side impact sensor connector (B).
|
Tightening torque :
8.0 ~ 12.0 N.m (0.82 ~ 1.22 kgf.m, 5.9 ~ 8.9 lb-ft)
|
|
| 2. |
Install the center pillar lower trim.
(Refer to Body - "Center pillar trim")
|
| 3. |
Install the door scuff trim.
(Refer to Body - "Door scuff trim")
|
| 4. |
Reconnect the battery negative cable.
|
| 5. |
After installing the Side Impact Sensor, confirm proper system operation:
| • |
Turn the ignition switch ON; the SRS indicator light should
be turned on for about six seconds and then go off.
|
|
Description
Driver can control the passenger airbag operating Condition (Enable or Disable)
by using this PAB ON/OFF switch.
Passenger Airbag (PAB) ON/OFF Switch is installed i ...
Other information:
Replacement
•
Put on gloves to protect your hands.
•
When ...
Specification
[Throttle Position Sensor (TPS)]
Throttle angle(°)
Output Voltage (V) [Vref=5V]
TPS1
TPS2
0
0.5
4.5
10
0.96
4.05
...

 Side Impact Sensor (SIS) Components and components location
 PAB ON/OFF Switch Description and operation