Kia Carens: Cylinder Block / Piston and Connecting Rod Repair procedures
Kia Carens RP (2013-2018) Service Manual / Engine Mechanical System / Cylinder Block / Piston and Connecting Rod Repair procedures
| Disassembly |
|

|

| 1. |
Remove the engine and transaxle assembly from the vehicle.
(Refer to Engine and Transaxle Assembly - "Engine and Transaxle Assembly")
|
| 2. |
Remove the transaxle assembly from the engine assembly.
|
| 3. |
Remove the drive plate or flywheel.
|
| 4. |
Remove the rear oil seal.
(Refer to Cylinder Block Assembly - "Rear Oil Seal")
|
| 5. |
Install the engine assembly to engine stand for disassembly.
|
| 6. |
Remove the intake manifold.
(Refer to Intake And Exhaust System - "Intake Manifold")
|
| 7. |
Remove the exhaust manifold.
(Refer to Intake And Exhaust System - "Exhaust Manifold")
|
| 8. |
Remove the timing chain.
(Refer to Timing System - "Timing Chain")
|
| 9. |
Remove the cylinder head assembly.
(Refer to Cylinder Head Assembly - "Cylinder Head")
|
| 10. |
Remove the oil filter.
(Refer to Lubrication System - "Oil Filter")
|
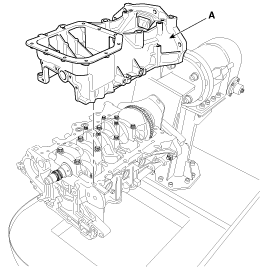
| 11. |
Remove the oil pan and the oil screen.
(Refer to Lubrication System - "Oil Pan")
|
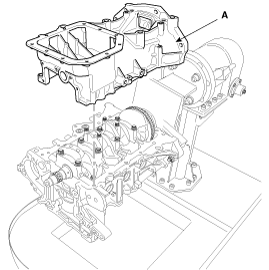
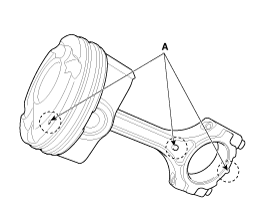
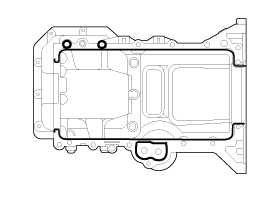
| 12. |
Remove the ladder frame (A).
|
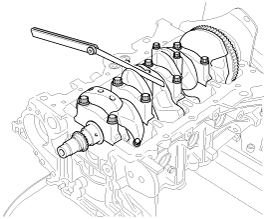
| 13. |
Check the connecting rod side clearance.
|
| 14. |
Check the connecting rod bearing cap oil clearance.
|
| 15. |
Remove the piston and connecting rod assembly.
|

| 16. |
Check fit between piston and piston pin.
Try to move the piston back and forth on the piston pin. If any movement
is felt, replace the piston and pin as a set.
|
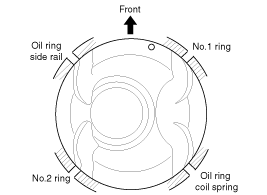
| 17. |
Disassemble the piston rings.
|
| 18. |
Disassemble the connecting rod from the piston.
Using a hydraulic press, remove the piston pin from piston.
|
| Inspection |
Connecting Rod
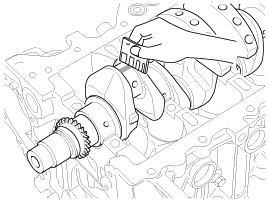
| 1. |
Check the side clearance between piston and connecting rod.
Using filler gauge, measure the side clearance while moving the connecting
rod back and forth.
|
| 2. |
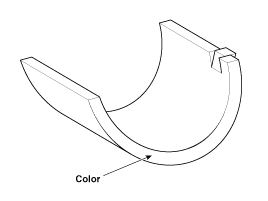
Check the connecting rod bearing oil clearance.
|
|||||||||||||||||||||||||||||||||||||||||||||||||||||||||||||||||||||||||||||||||||||||||||||||||||
| 3. |
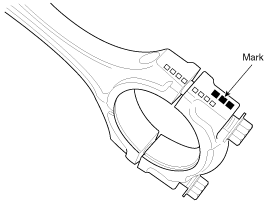
Check the connecting rods.
|
Piston
| 1. |
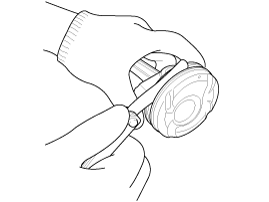
Clean the piston.
|
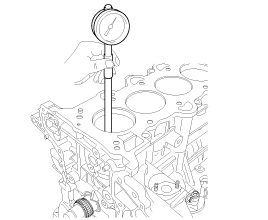
| 2. |
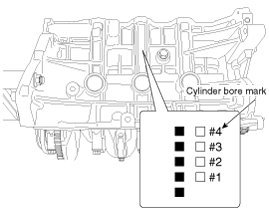
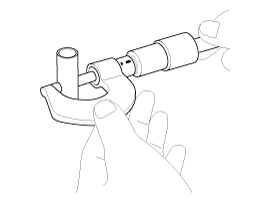
Check the piston-to-cylinder clearance by calculating the difference
between the cylinder bore inner diameter and the piston outer diameter.
|
| 3. |
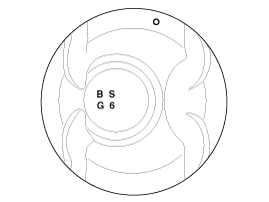
Select the piston matching with cylinder bore class.
|
Piston Rings
| 1. |
Inspect the piston ring side clearance.
Using a feeler gauge, measure the clearance between new piston ring
and the wall of ring groove.
If the clearance is greater than maximum, replace the piston.
|
| 2. |
Inspect the piston ring end gap.
To measure the piston ring end gap, insert a piston ring into the cylinder
bore. Position the ring at right angles to the cylinder wall by gently
pressing it down with a piston. Measure the gap with a feeler gauge.
If the gap exceeds the specifications, replace the piston rings. If
the gap is too large, recheck the cylinder bore inner diameter. If the
bore is over the specifications, the cylinder block must be rebored.
|

Piston Pins
| 1. |
Measure the outer diameter of piston pin
|
| 2. |
Measure the piston pin-to-piston clearance.
|
| 3. |
Check the difference between the piston pin outer diameter and the connecting
rod small end inner diameter.
|
| Reassembly |
|
| 1. |
Assemble the piston and the connecting rod.
|
| 2. |
Assemble the piston rings.
|
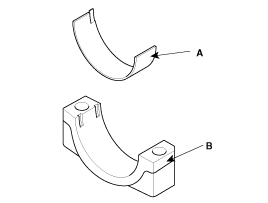
| 3. |
Assemble the connecting rod bearings.
|
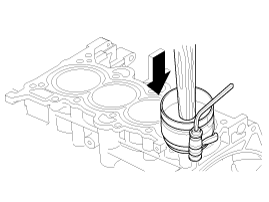
| 4. |
Insert the piston and connecting rod assemblies into the cylinder bores.
|
| 5. |
Check the side clearance between piston and connecting rod.
|
| 6. |
Install the ladder frame.
|
| 7. |
Assemble the other parts in the reverse order of disassembly.
|
 Piston and Connecting Rod Components and components location
Components
1. Piston ring
2. Piston
3. Piston pin
4. Connecting rod
5. Connecting rod upper bearing
6. Connecting rod lower bearing
7. Conne ...
 Crankshaft Components and components location
Components
1. Crankshaft sprocket s
2. Crankshaft thrust bearing
3. Crankshaft upper main bearing
4. Crankshaft
5. CKPS wheel
6. Crankshaft lower m ...
Other information:
Kia Carens RP (2013-2018) Owners Manual: Portable lamp usage
1. In-vehicle lamp, if necessary, after separation can be used as a portable. 2. Press the button (1). 3. Pull out the lamp holder. 4. Press the power switch (2). ❈ If the portable lamp does not turn on, it means the portable lamp needs to be charged. Insert the lamp holder and then charge it ag ...
Kia Carens RP (2013-2018) Owners Manual: Parking brake - Hand type
Checking the parking brake Check the stroke of the parking brake by counting the number of “clicks’’ heard while fully applying it from the released position. Also, the parking brake alone should securely hold the vehicle on a fairly steep grade. If the stroke is more or less than specifie ...
Copyright © www.kicaman.com 2015-2026
