Kia Carens: Front Door / Front Door Window Glass Repair procedures
Kia Carens RP (2013-2018) Service Manual / Body (Interior and Exterior) / Front Door / Front Door Window Glass Repair procedures
| Replacement |
| 1. |
Remove the front door trim.
(Refer to Front Door - "Front Door Trim")
|
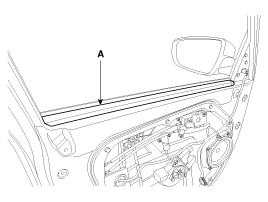
| 2. |
Remove the front door belt inside weatherstrip (A).
|
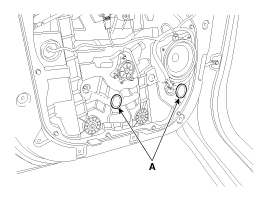
| 3. |
Remove the front door window glass mounting hole plug (A).
|
| 4. |
Before removing the front door glass (C), loosen the mounting bolt (A)
as loosely as possible and loosen the mounting bolt (B) completely.
|
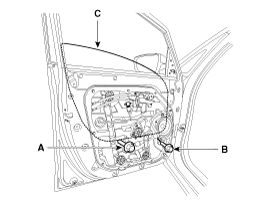


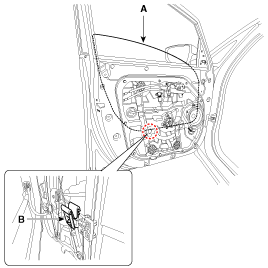
| 5. |
Carefully adjust the front door window glass (A) until you can see the
bolts, then loosen them. Separate the glass from the glass run and carefully
pull the glass out through the window slot.
|
| 6. |
Install in the reverse order of removal.
|
 Front Door Window Glass Components and components location
Component Location
1. Front door window glass
...
 Front Door Module Components and components location
Component Location
1. Front door module
...
Other information:
Kia Carens RP (2013-2018) Owners Manual: Checking the brake/clutch fluid level
Check the fluid level in the reservoir periodically. The fluid level should be between MAX and MIN marks on the side of the reservoir. Before removing the reservoir cap and adding brake/clutch fluid, clean the area around the reservoir cap thoroughly to prevent brake/clutch fluid contamination. I ...
Kia Carens RP (2013-2018) Service Manual: Multimedia Jack Repair procedures
Removal 1. Disconnect the negative (-) battery terminal. 2. Remove the console front complete assembly (A). (Refer to Body - "Floor Console Assembly") 3. Remove the multimedia ja ...
Copyright © www.kicaman.com 2015-2026
